In this article, we’ll be designing and building a simple headless ecommerce page with AI and Shopify Hydrogen. Since this can imply many different things:
- We’ll be using AI to help design our ecommerce landing page from visuals (using Midjourney) and up to getting copy content (with chat.openai.com).
- We’ll be using Shopify’s Hydrogen tool to build out our ecommerce page.
Ecommerce websites often have many different pages and sections which include information like products, collections, listings, discounts, FAQ, etc. We’ll be building a much more simple and straightforward ecommerce site. Our site will only contain a single landing page that provides users the information to purchase one product from our site. There will be some content that describes the product and a single call to action (i.e. button) where the user can click to purchase this product.
This article will be broken down into a few sections. First, we’ll discuss what we’ll be selling before discussing how we’ll come up with the design of our landing page. We’ll then move towards creating our Shopify store, building the custom storefront app, and finally deploying our ecommerce page to a production URL.
Designing the ecommerce page
Using Chat GPT to create a product idea
Unfortunately, I don’t have any physical products to sell at the moment so we’ll be creating a fictional product for this article. In particular, we’ll create a fictional pair of sneakers to sell.
We’ll use Chat GPT (i.e. chat.openai.com) to generate some ideas of names of shoe brands.
If you’re unaware, Chat GPT is a web page for interacting with OpenAI’s GPT-3 language model through a chat interface. GPT-3 is a state-of-the-art machine learning model that has been trained on a massive amount of text data and can understand and generate human-like text. Users can input text and receive responses from the model, which can assist with a variety of tasks such as answering questions, generating text, and more.
I generated this above explanation with the help of Chat GPT.
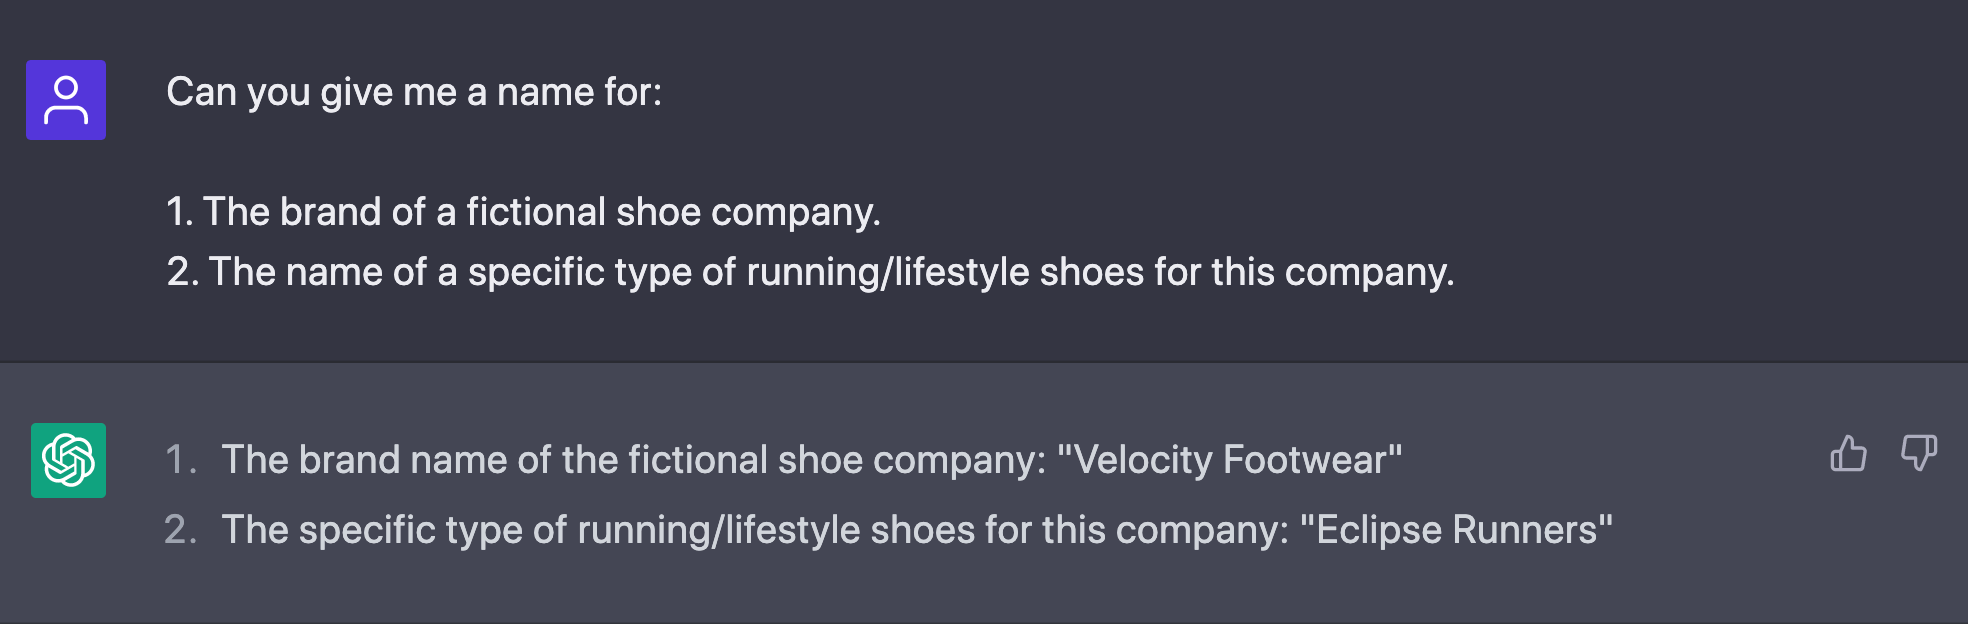
We’ll provide the following prompt to Chat GPT.
1Can you give me a name for:231. The brand of a fictional shoe company.42. The name of a specific type of running/lifestyle shoes for this company.
Chat GPT than gives us the following response.
We’d like a few more ideas than this so we’ll ask Chat GPT to give us more options.
1Can you give me 5 different iterations of the above?
And Chat GPT gives us some more ideas.
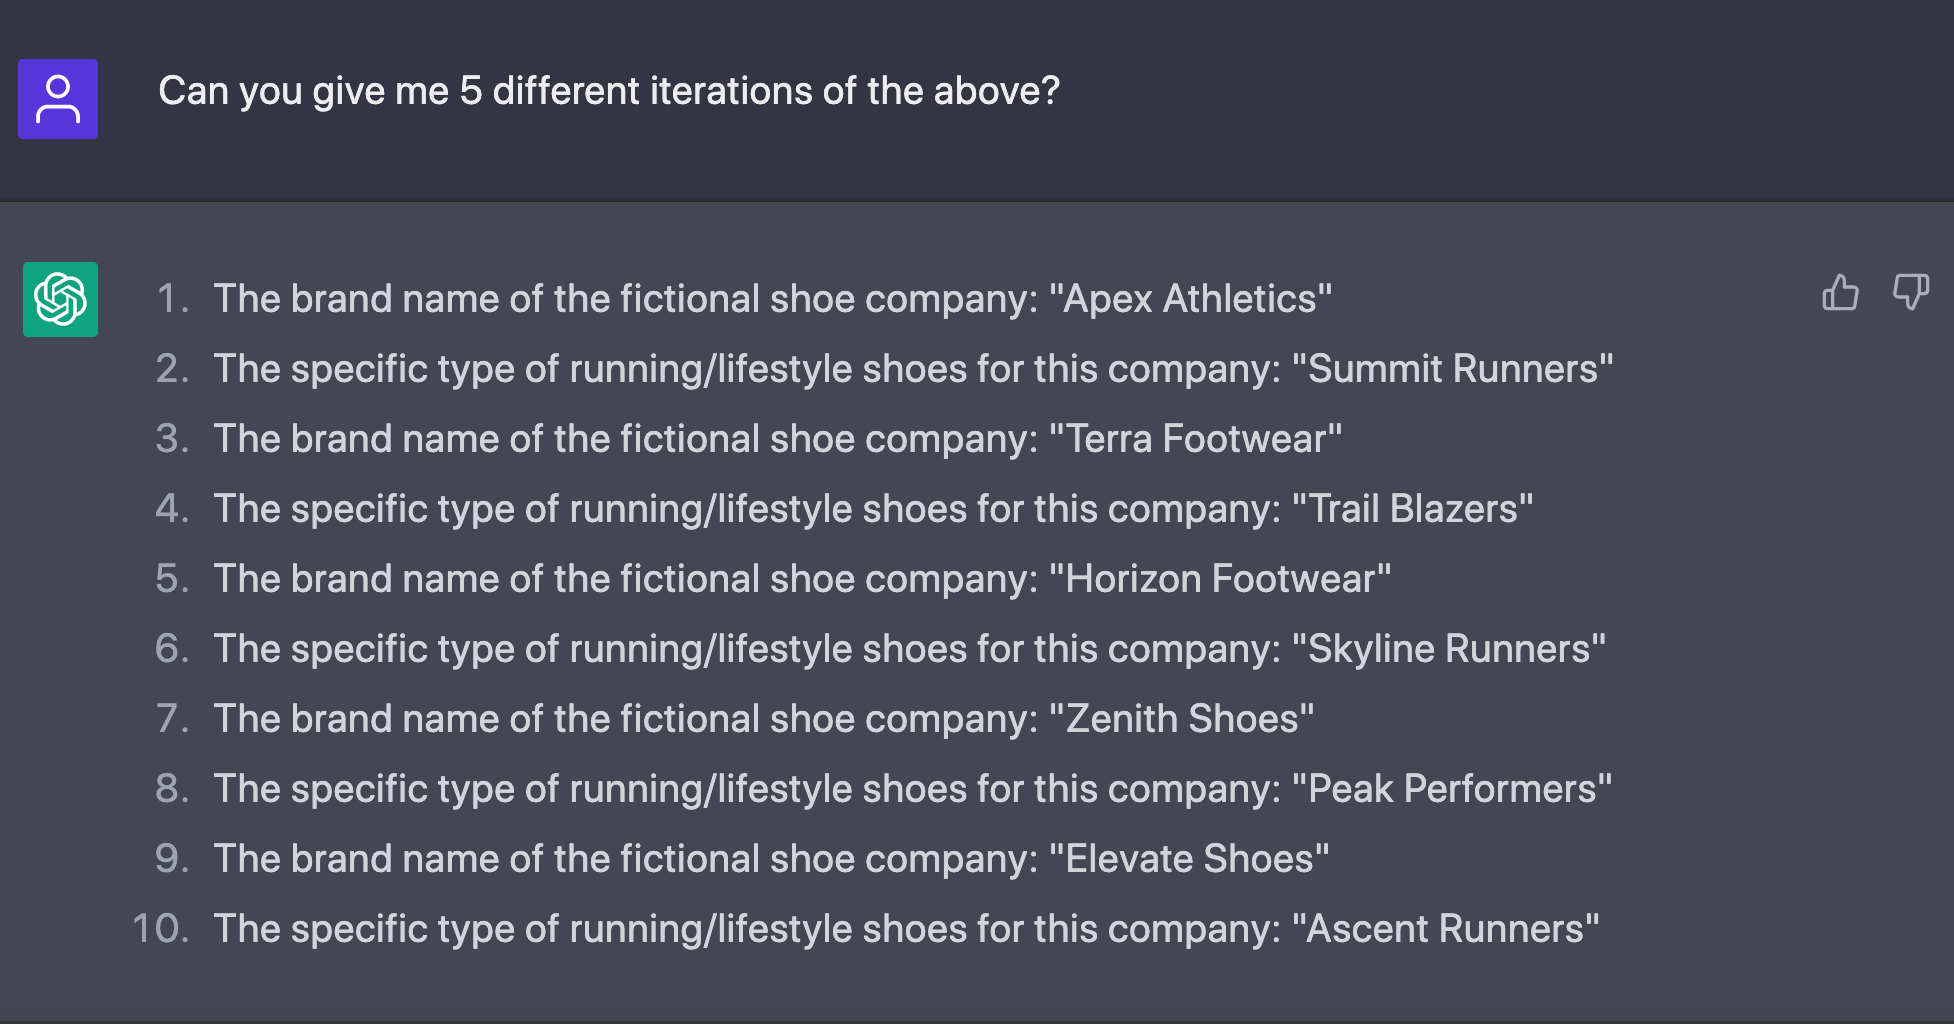
The shoe company name of “Apex Athletics” and the shoe name of “Trail Blazers” sounds great so we’ll use those. We’ll be building the ecommerce landing page of the newly released Trail Blazers from Apex Athletics.
Creating the visual with Midjourney
Now that we know what we’re selling and what it’s called, we’ll move towards getting the visual for the fictional pair of shoes. We’ll create the visual asset of a custom shoe design with the help of Midjourney.
Midjourney is a tool that leverages AI and machine learning to create images from text prompts. At the time of publishing this article, Midjourney can only be used entirely from their Discord channel. The Midjourney quick start guide has some useful information on how to get started.
We’ll provide the following prompt to ask Midjourney to create a wallpaper of a pair of sneakers with some fire (for added cool factor).
1wallpaper, cool lifestyle sneakers, black background, fire, red, orange --v 4
Let’s break down the above prompt.
wallpaper: We’re asking midjourney to create a wallpaper since we want just the visual of the sneakers on a background with no other visual distractions.cool lifestyle sneakers, black background, fire, red, orange: This represents everything we hope to see in the generated wallpaper.--v 4: This tells Midjourney to use the latest Midjourney algorithm, Version 4.
With the above prompt, Midjourney provides us with some great visuals.

The fourth option looks great so we’ll ask Midjourney to come up with a few different variations of it.

The first variation shown in the list looks the best so we’ll ask Midjourney to upscale this specific variation to generate a larger image we can use in our ecommerce page.

Designing the landing page
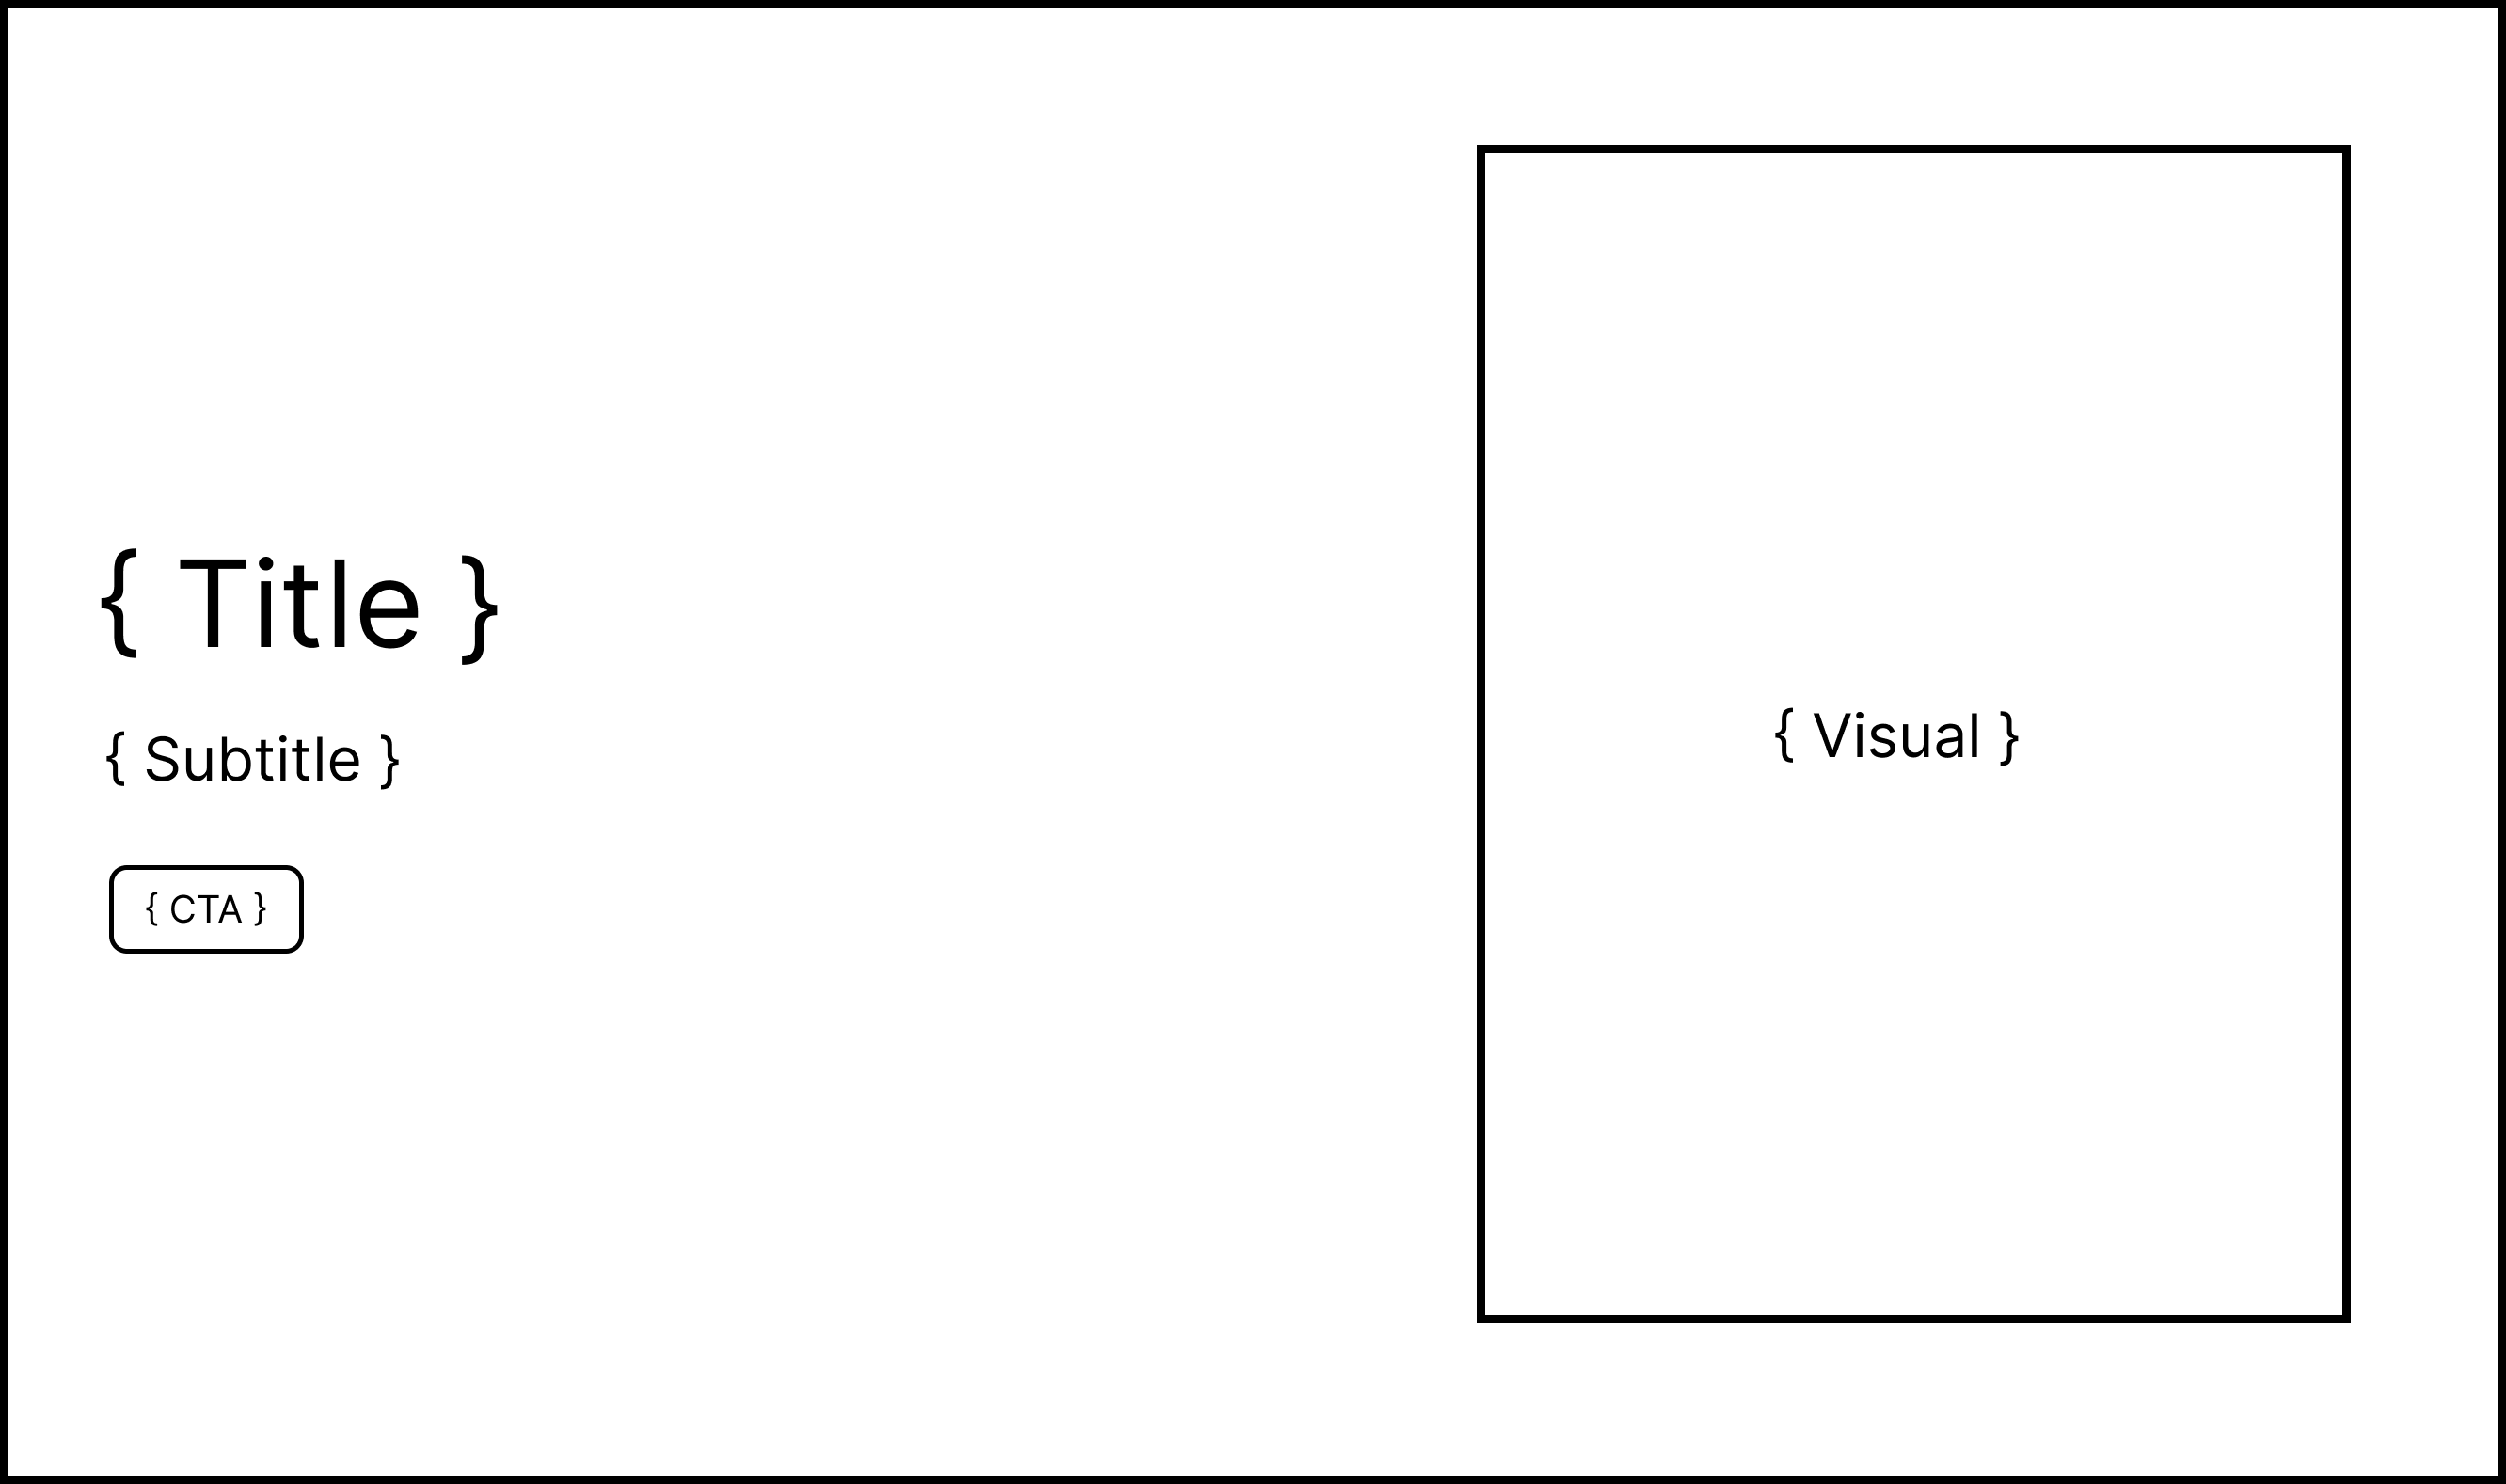
Now that we have the visual asset available to us, we’ll go ahead and design the landing page. The page will only consist of a hero banner that contains some copy to describe the product and a call to action for the user to buy said product.
We’ll use Figma to help prepare a design on how we’d like the page to look. First, we’ll place the visual on a background of similar color.

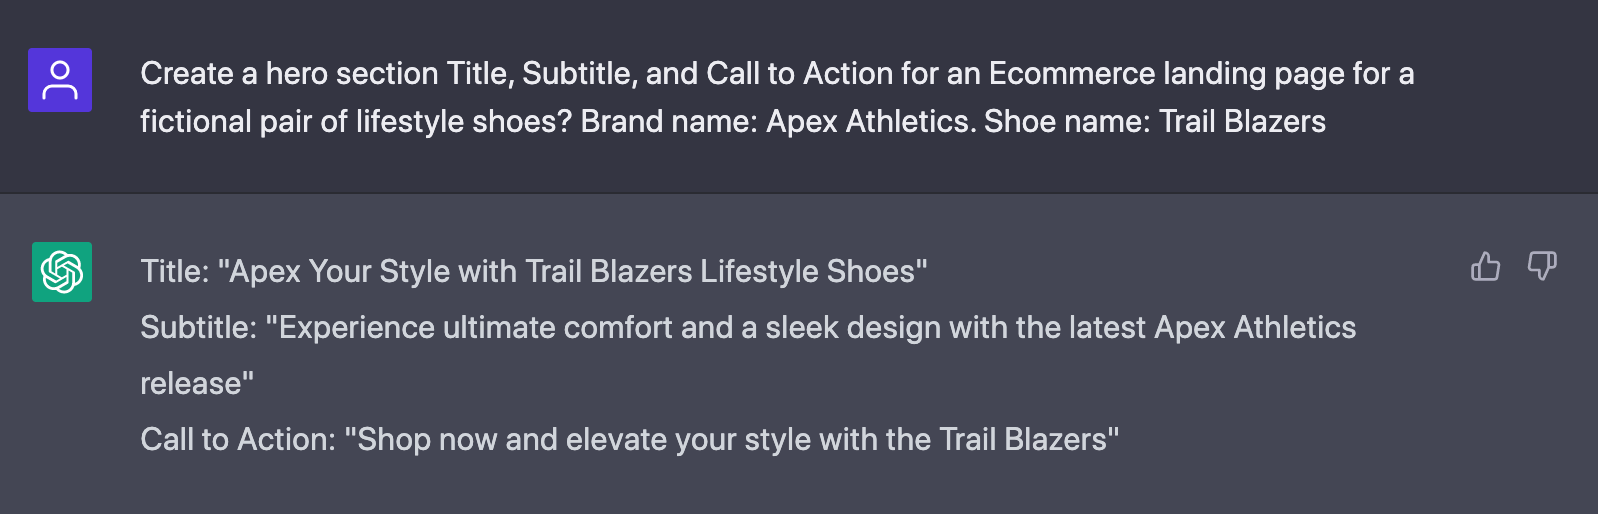
We’ll ask Chat GPT to prepare some copy text for a title, subtitle, and call to action button in our landing page.
1Create a hero section Title, Subtitle, and Call to Action2for an Ecommerce landing page for a fictional pair of lifestyle shoes?34Brand name: Apex Athletics. Shoe name: Trail Blazers
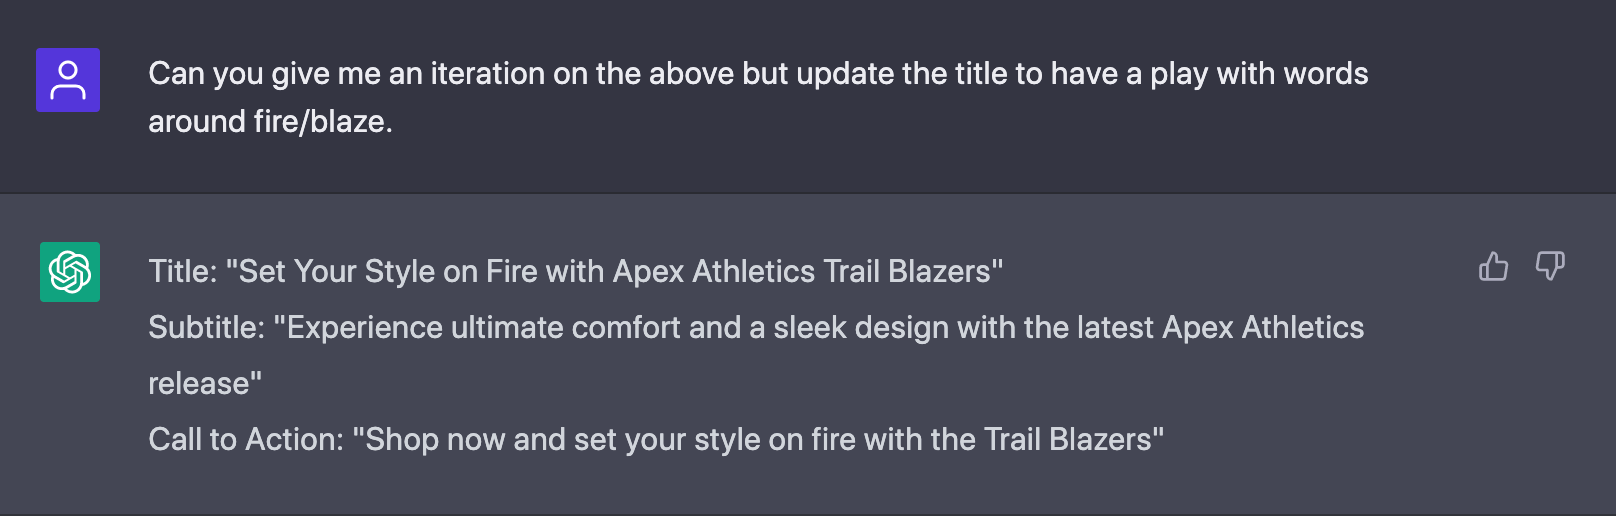
We’ll ask a follow-up to Chat GPT to iterate on the above and instead provide a title that has some reference to fire to accommodate how our visual is designed.
1Can you give me an iteration on the above but update the title2to have a play with words around fire/blaze.
With this content available to us, we’ll place this content in our design for our landing page and add some minor styling and spacing where applicable.

We’ll fine-tune the above design by:
- Using a sans-serif style font for the title. We’ll also have the “Fire” and “Apex Trail Blazers” text in the title be given an orange reddish color.
- Using a mono style font for the subtitle and “Buy now” button.
- Shrinking the “Buy Now” button and applying some rounded edges to it.
This makes the final design of our landing page look like the following:

With the design of our app complete, we can now move towards creating our store and building our ecommerce page.
Creating our Hydrogen project and Shopify Store
We’ll build our ecommerce page with the help of Shopify Hydrogen. Hydrogen is an open-source front-end framework that allows developers to create custom storefronts for Shopify stores using React, TypeScript, and GraphQL.
The framework consists of two elements:
- A Vite plugin which is a development server built around the native ES modules feature in modern browsers. The plugin allows for fast development (automatic reloading, hot module replacement, etc.) with a simple configuration.
- A set of functions, components, and utilities that allows us to interact with a Shopify store.
We’ll follow the steps outlined in the Hydrogen quickstart guide to set up a new Hydrogen development environment.
In the directory where we want to create our project, we’ll run the following command to create a new Hydrogen app:
1yarn create @shopify/hydrogen
When prompted to pick a certain template, we’ll select the Hello World template.
1? Choose a template2 Demo Store3> Hello World
When prompted to choose a language, we’ll select TypeScript.
1? Choose a language2 JavaScript3> TypeScript
Finally, when prompted to name our Hydrogen app, we’ll name it apex-trail-blazers.
1Name your new Hydrogen storefront2> apex-trail-blazers
When our project has been created, we’ll navigate into the project directory and run the following command to start the server.
1yarn run dev
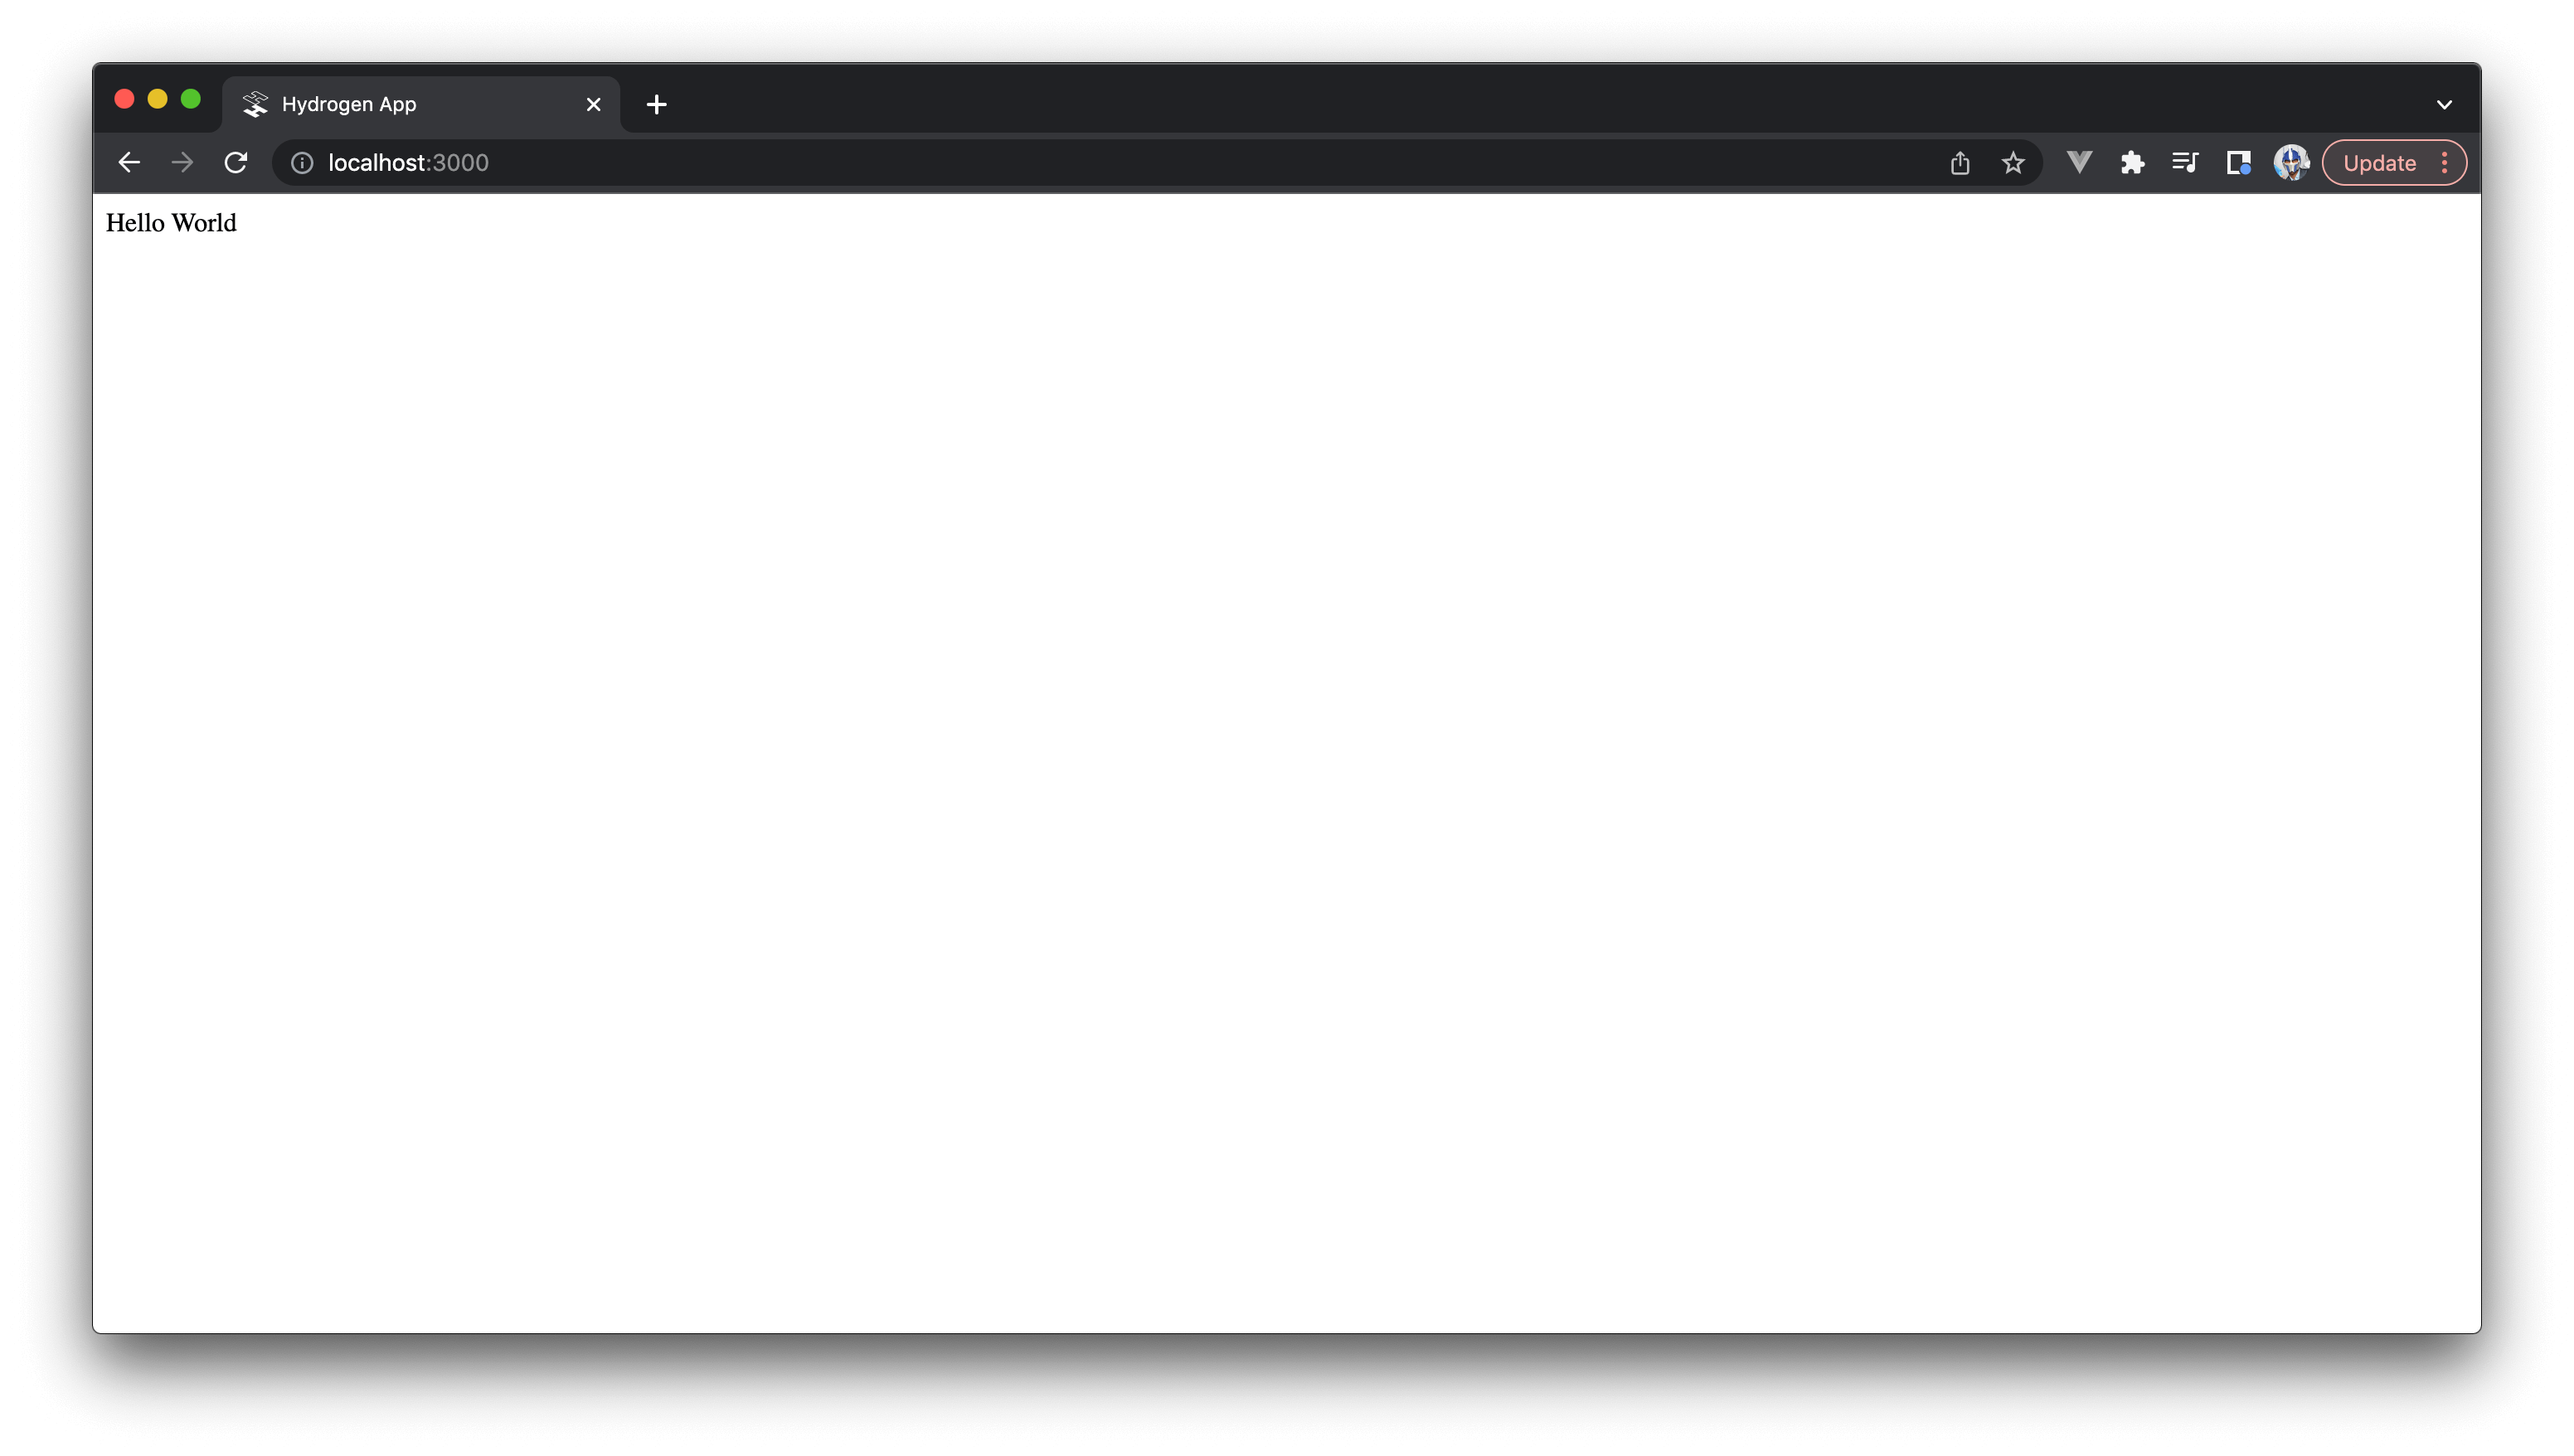
When our server is running successfully, we’ll be able to see the running app at http://localhost:3000/.
Our project layout is typical to a Vite development project.
1$ ls2 README.md3 package.json4 vite.config.js5 hydrogen.config.ts6 public/7 yarn.lock8 index.html9 src/10 node_modules/11 tsconfig.json
The vite.config.js file is the configuration file for the Vite development server. When looking through the file, we’ll notice
the Shopify Hydrogen plugin be the only plugin specified in our Vite configuration.
1import { defineConfig } from "vite";2import hydrogen from "@shopify/hydrogen/plugin";34export default defineConfig({5 plugins: [hydrogen()],6});
The Hydrogen plugin provides the capabilities of server-side rendering (SSR), hydration middleware, and client component code transformations in our Vite app.
The hydrogen.config.ts file is the configuration file for the Hydrogen app. At this moment, it contains configuration values for a demo Shopify store
our Hydrogen app is connected to.
1import { defineConfig } from "@shopify/hydrogen/config";23export default defineConfig({4 shopify: {5 storeDomain: "hydrogen-preview.myshopify.com",6 storefrontToken: "3b580e70970c4528da70c98e097c2fa0",7 storefrontApiVersion: "2022-07",8 },9});
The src/ directory contains the React and TypeScript files we’ll be working directly with.
1src/2 assets/3 routes/4 App.server.tsx5 index.css
Connecting our Shopify store
Before we begin working in our Hydrogen app, there’s a few steps we’ll need to take to make our Hydrogen app connect to our own Shopify store. This involves creating an access token to interact with the Storefront API to build a custom storefront for our Shopify store.
The Storefront API is a GraphQL-based API that allows developers to access and manipulate the data from a Shopify store’s storefront. The API provides a way to retrieve data such as products, collections, and customers, as well as perform operations such as creating and updating customer accounts, processing checkouts, and more.
We’ll first need to create a new Shopify store. Shopify provides a free trial before requiring customers to commit to an active monthly plan. With the help of a free trial, we’ll create a new store named “apex-trail-blazers”. When our store is successfully created, we’ll be taken to the admin of our newly created store.

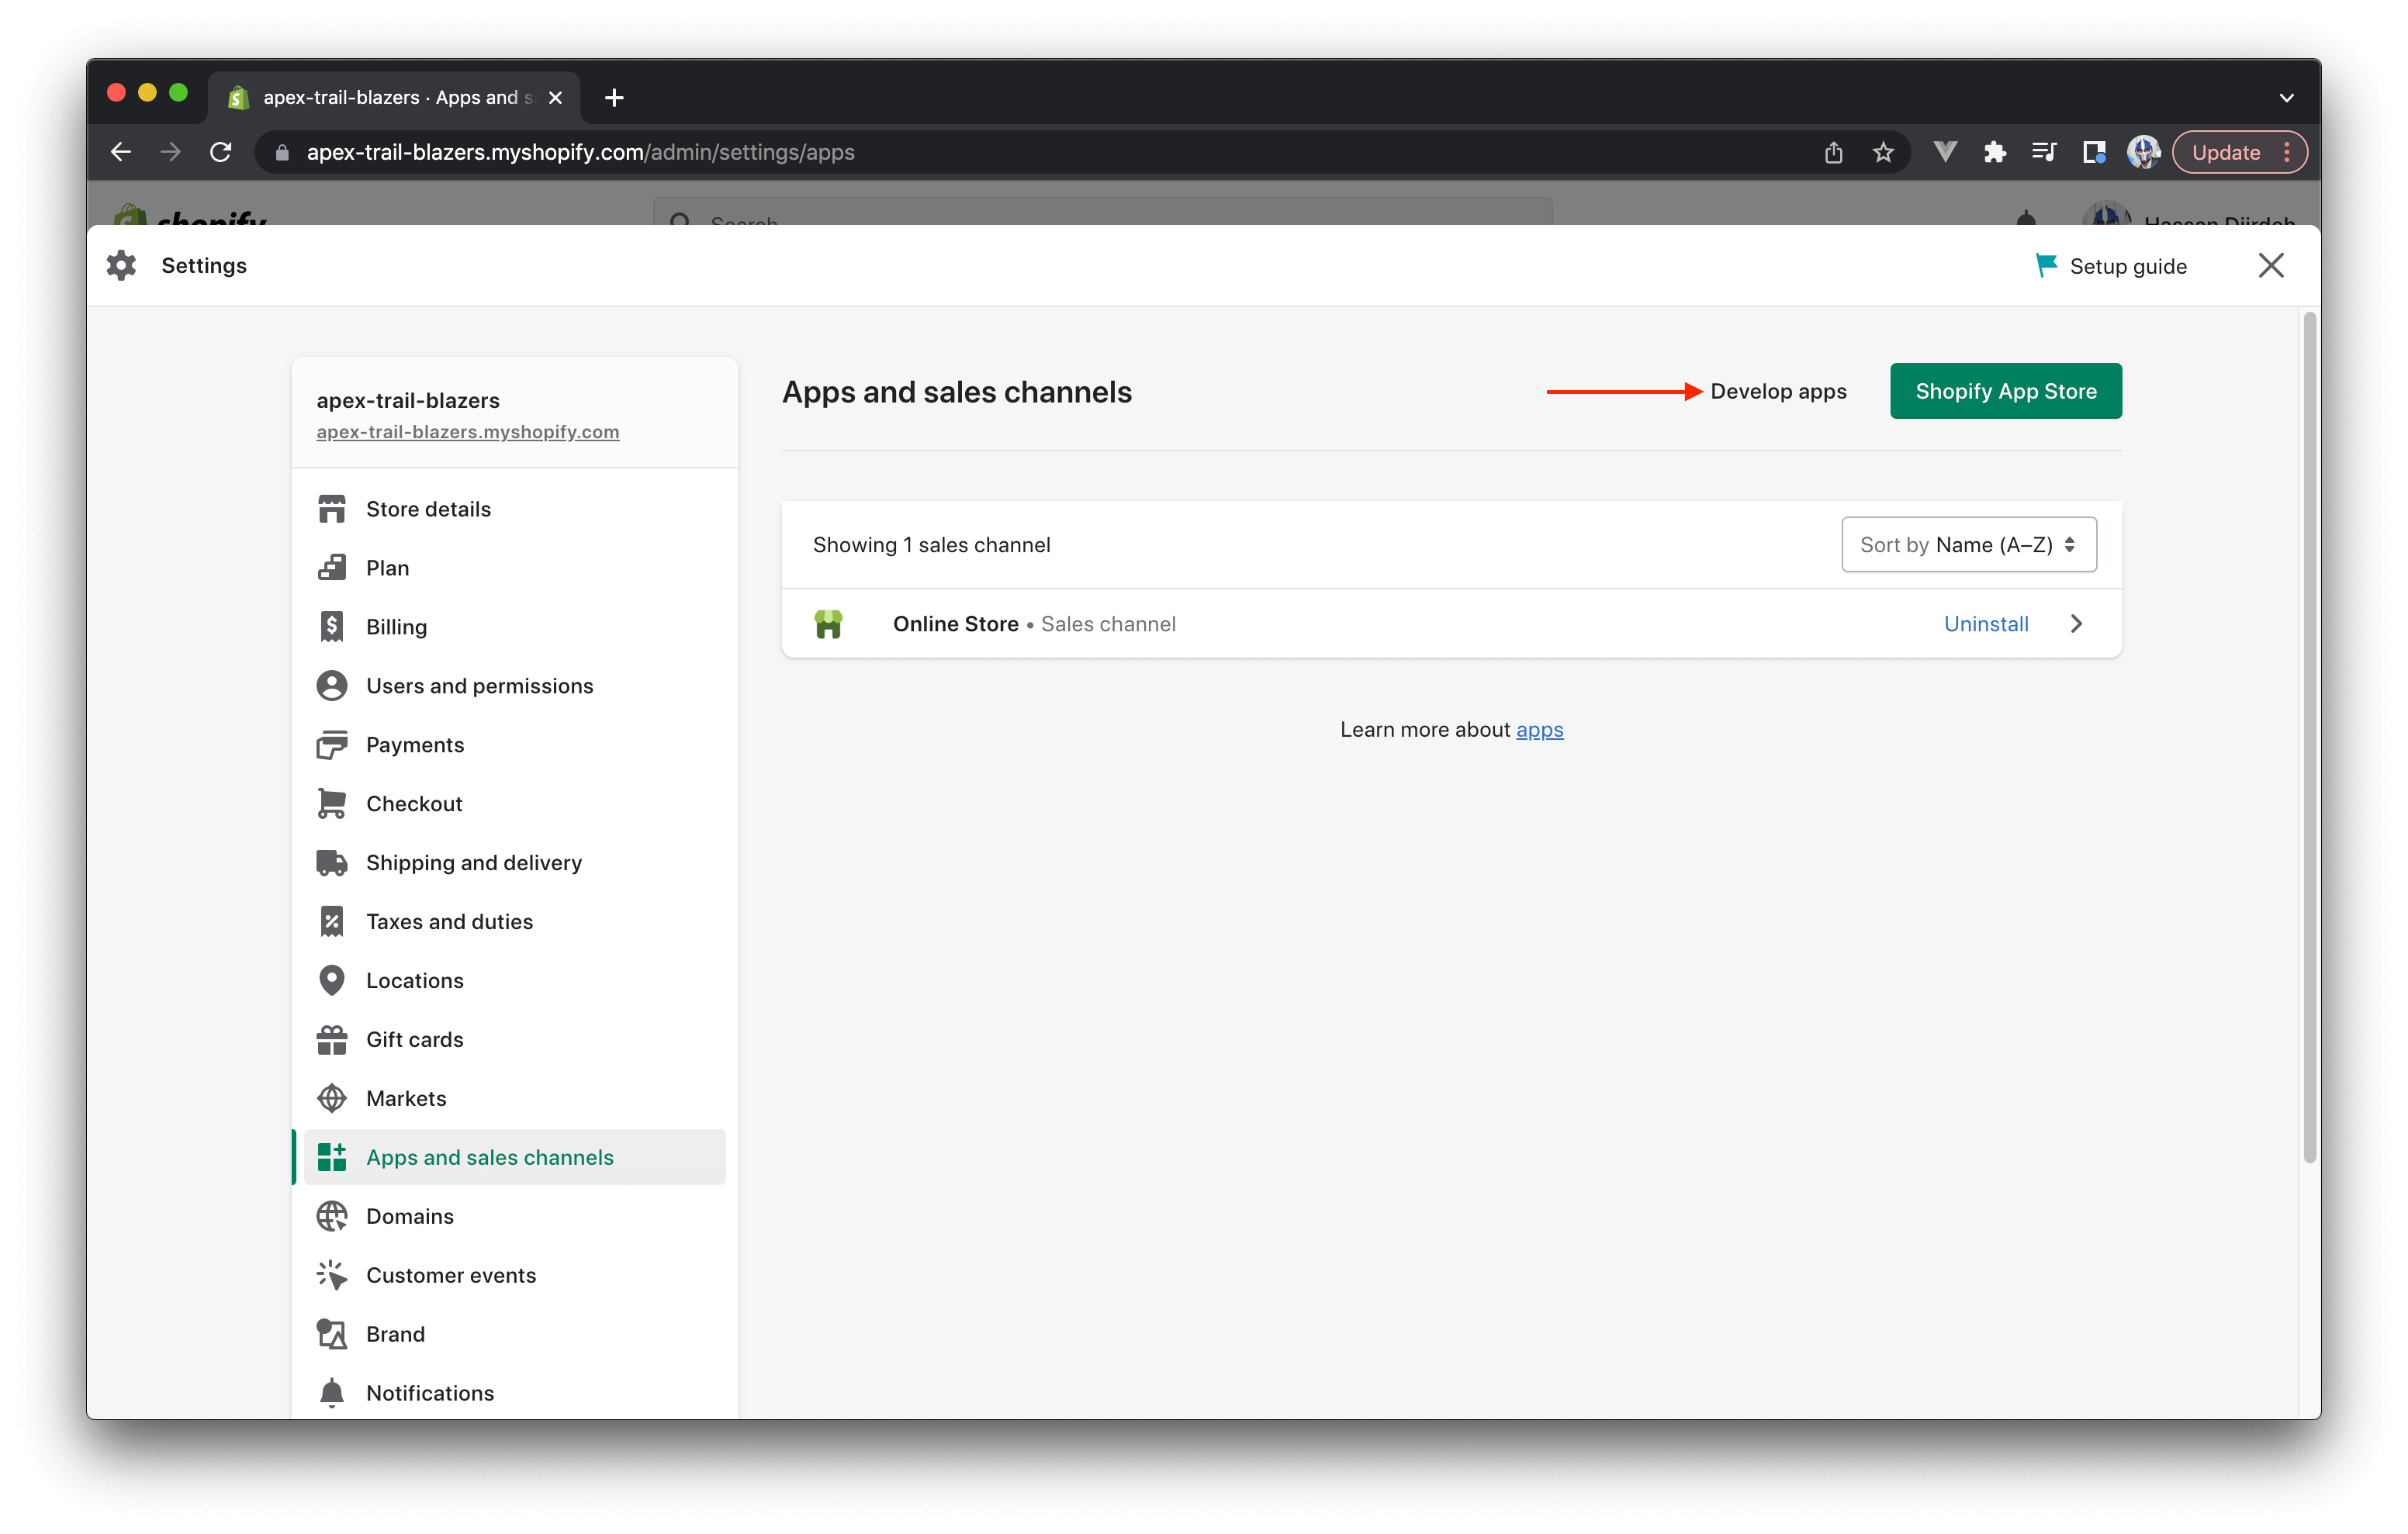
In our store’s admin, we’ll navigate to the “Settings” view and then the “Apps and sales channels” page (i.e. the admin/settings/apps pathname). Here we’ll be presented with a link labeled
“Develop apps”.
When clicking the “Develop apps” button, we’ll then be asked if we want to allow custom app development in our store.

When we’ve turned on custom app development in our store, we’ll be able to create a new app for our Shopify store.
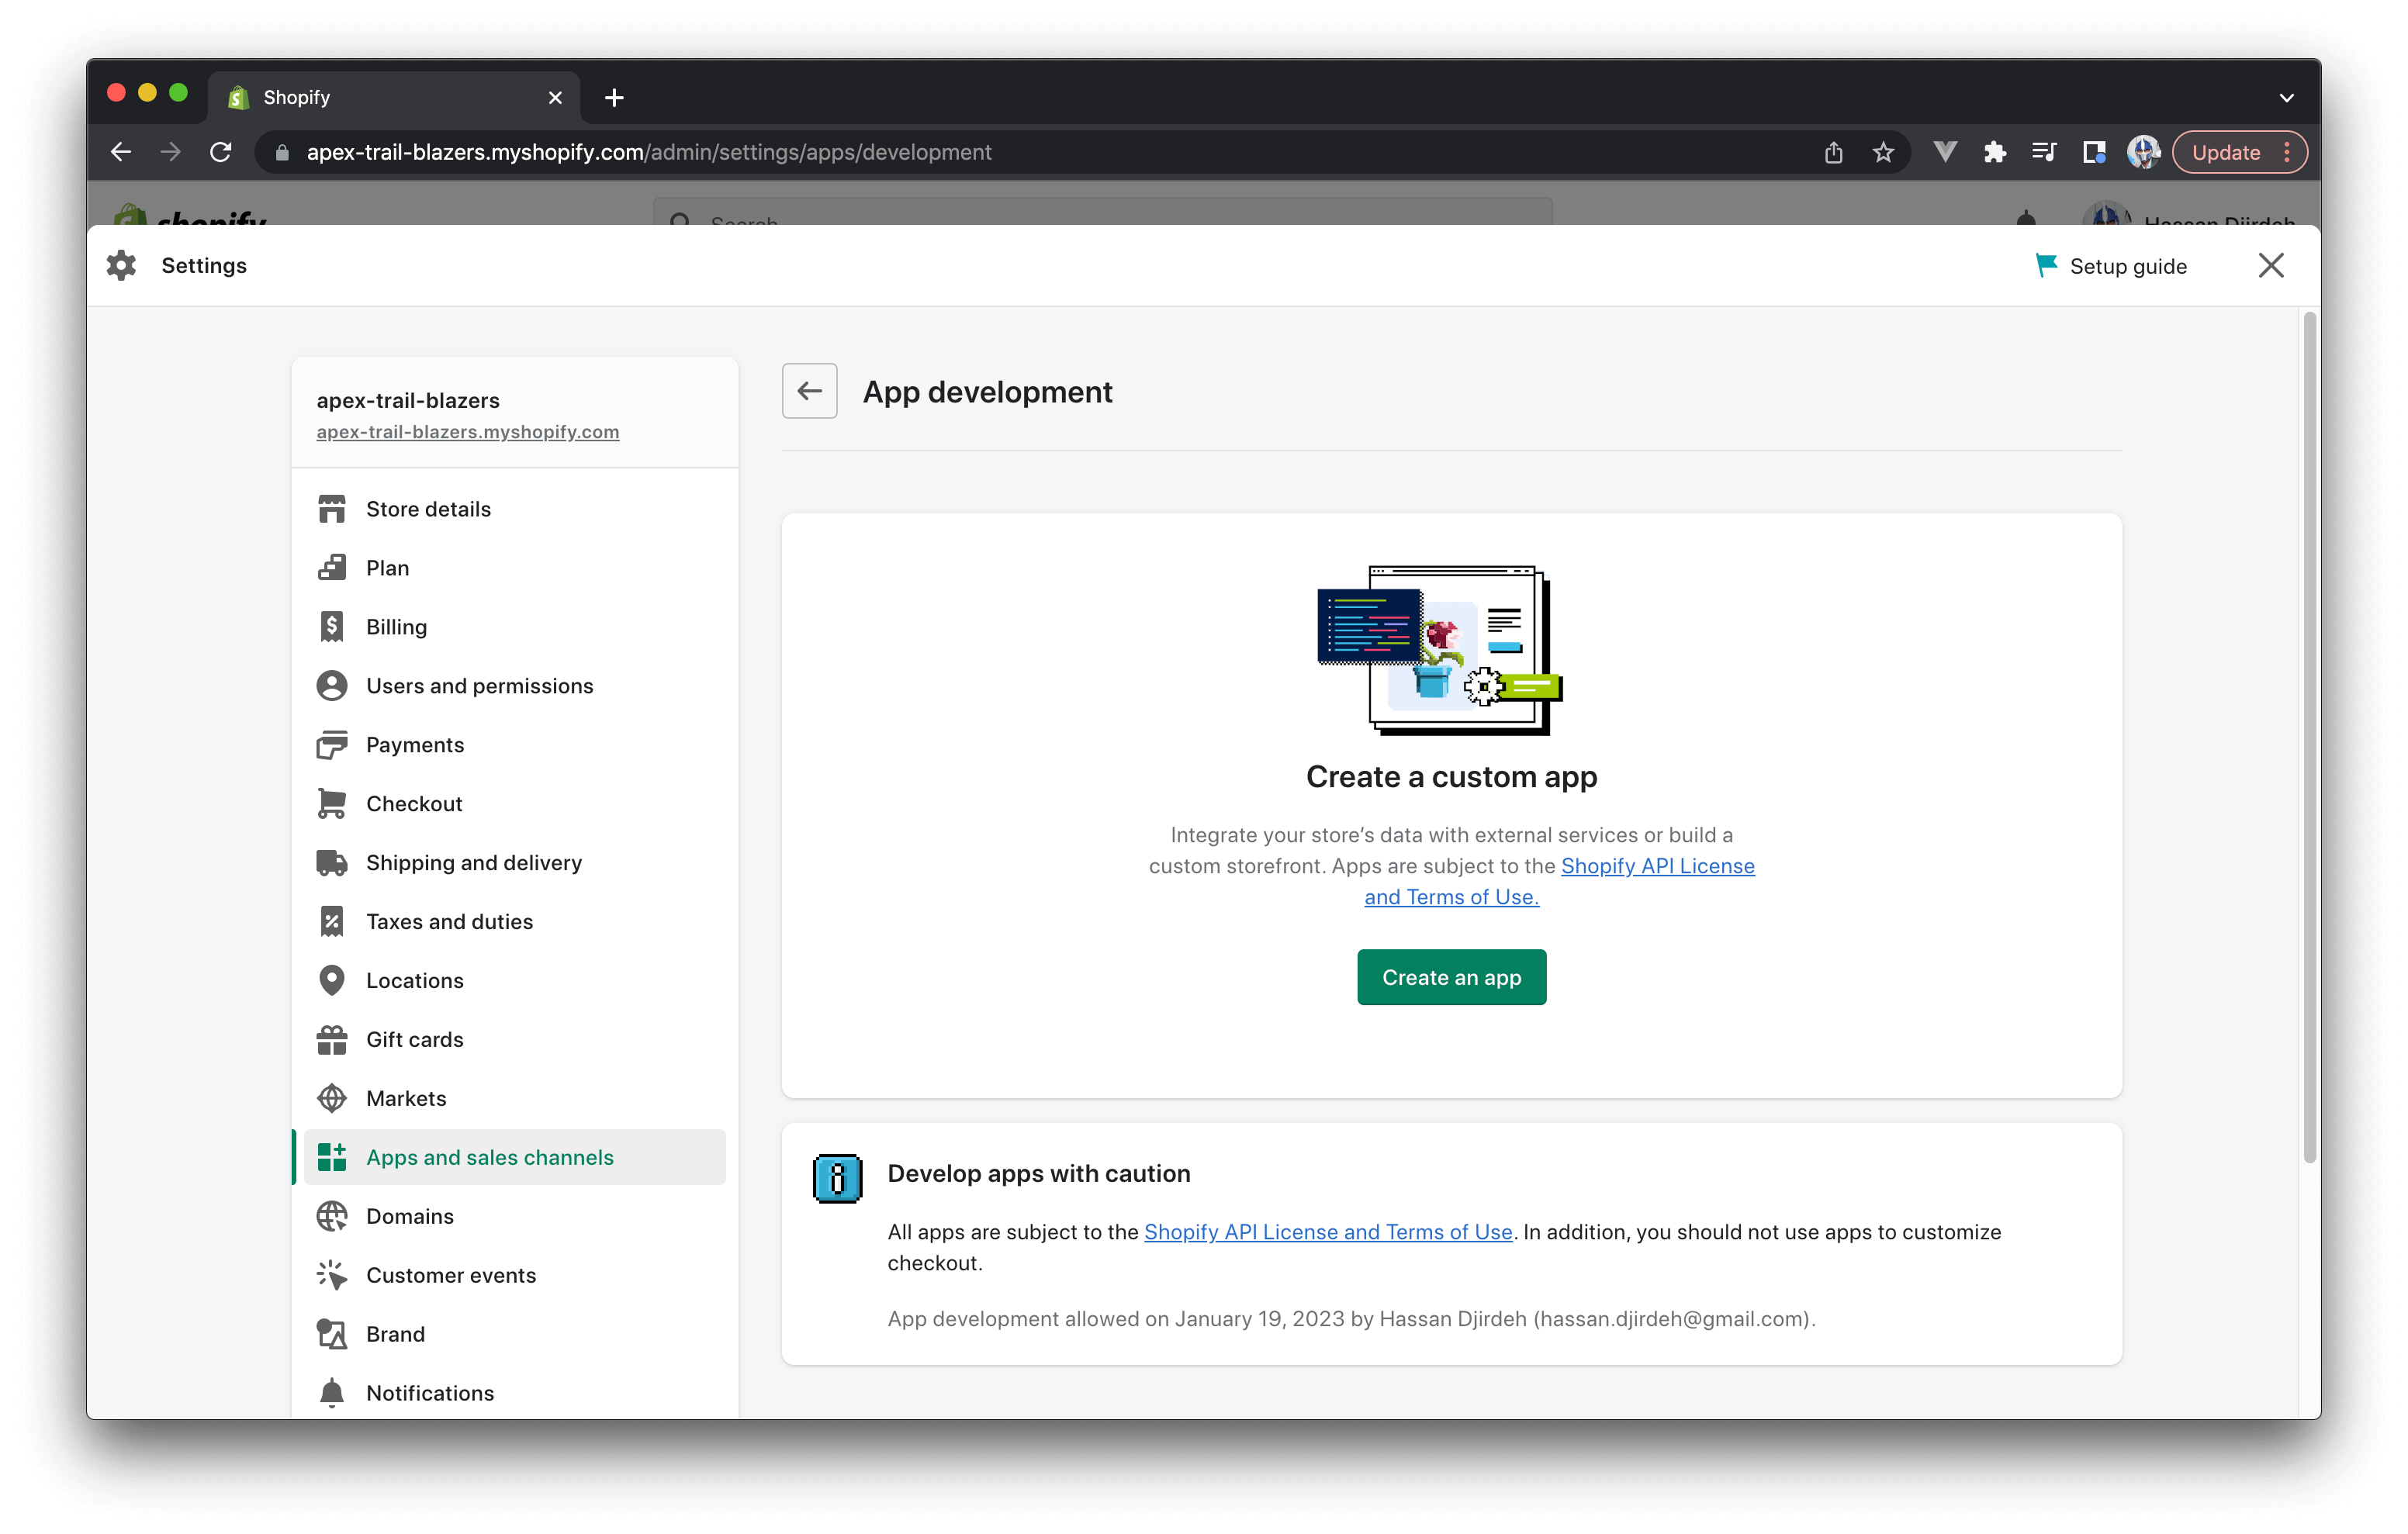
We’ll go ahead and create a new app and call it “Custom Hydrogen Storefront”. In the newly created app settings, we’ll select the “Configure Storefront API scopes” button to configure the Storefront API scopes for our app.
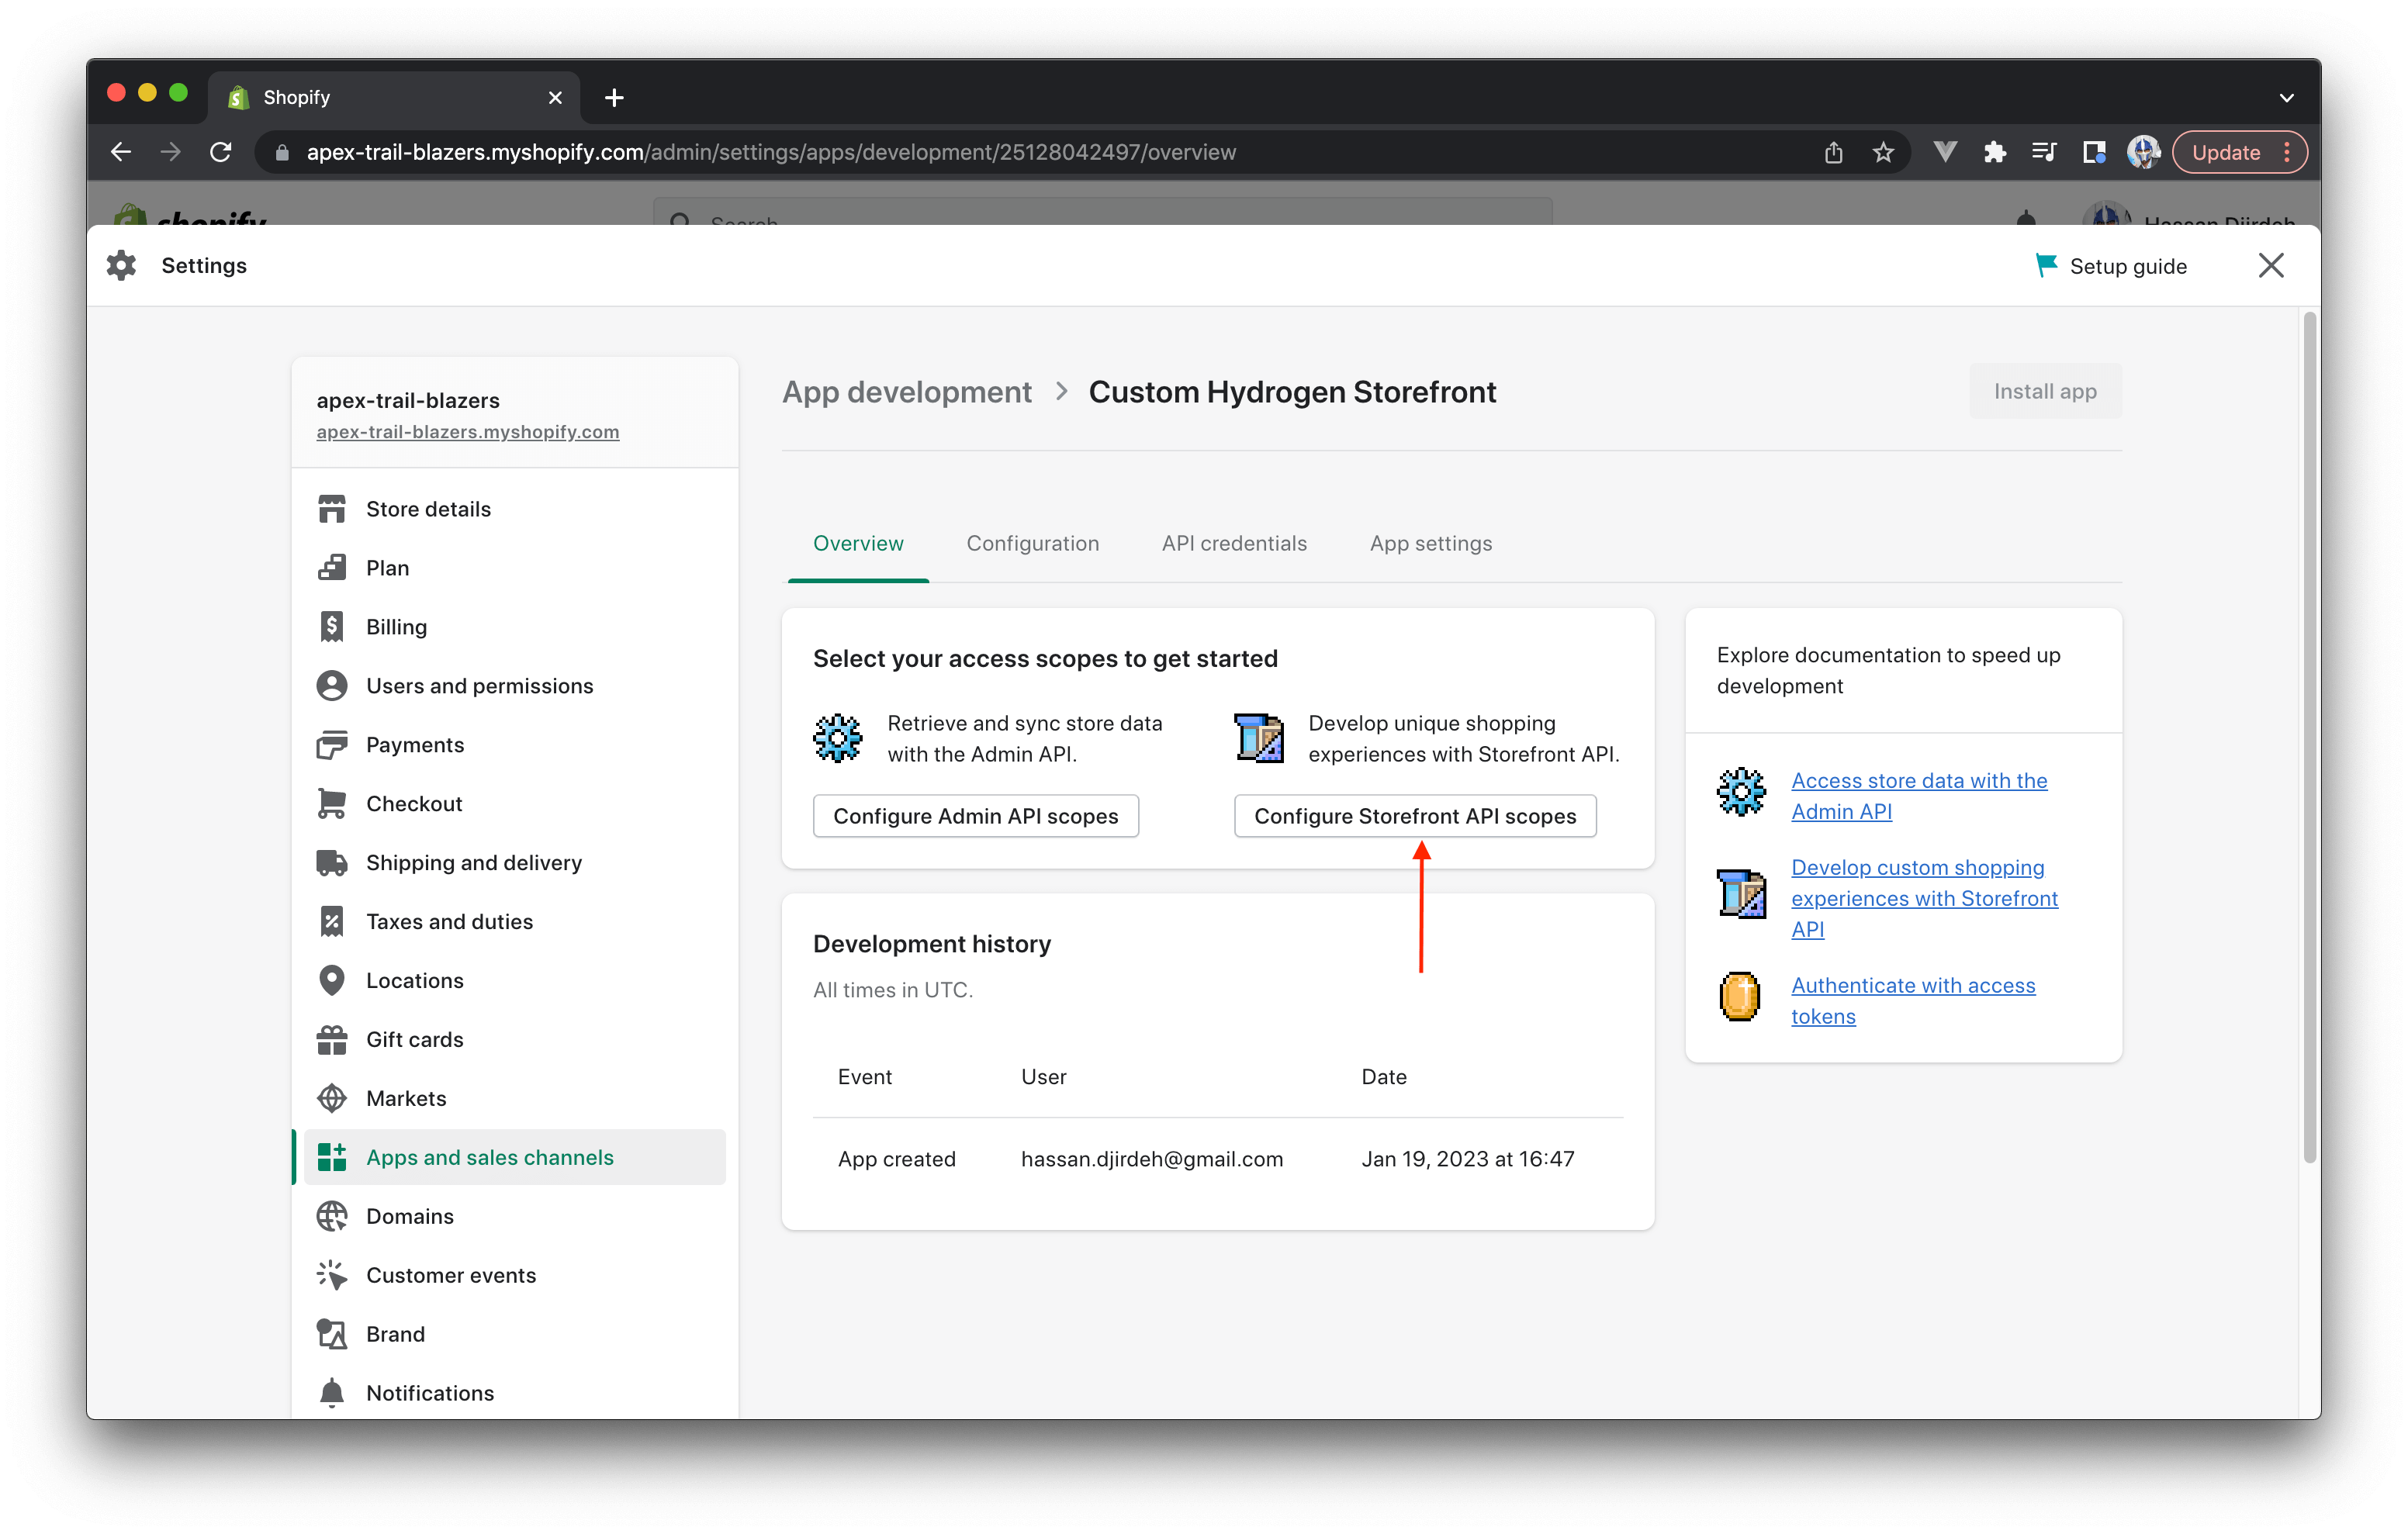
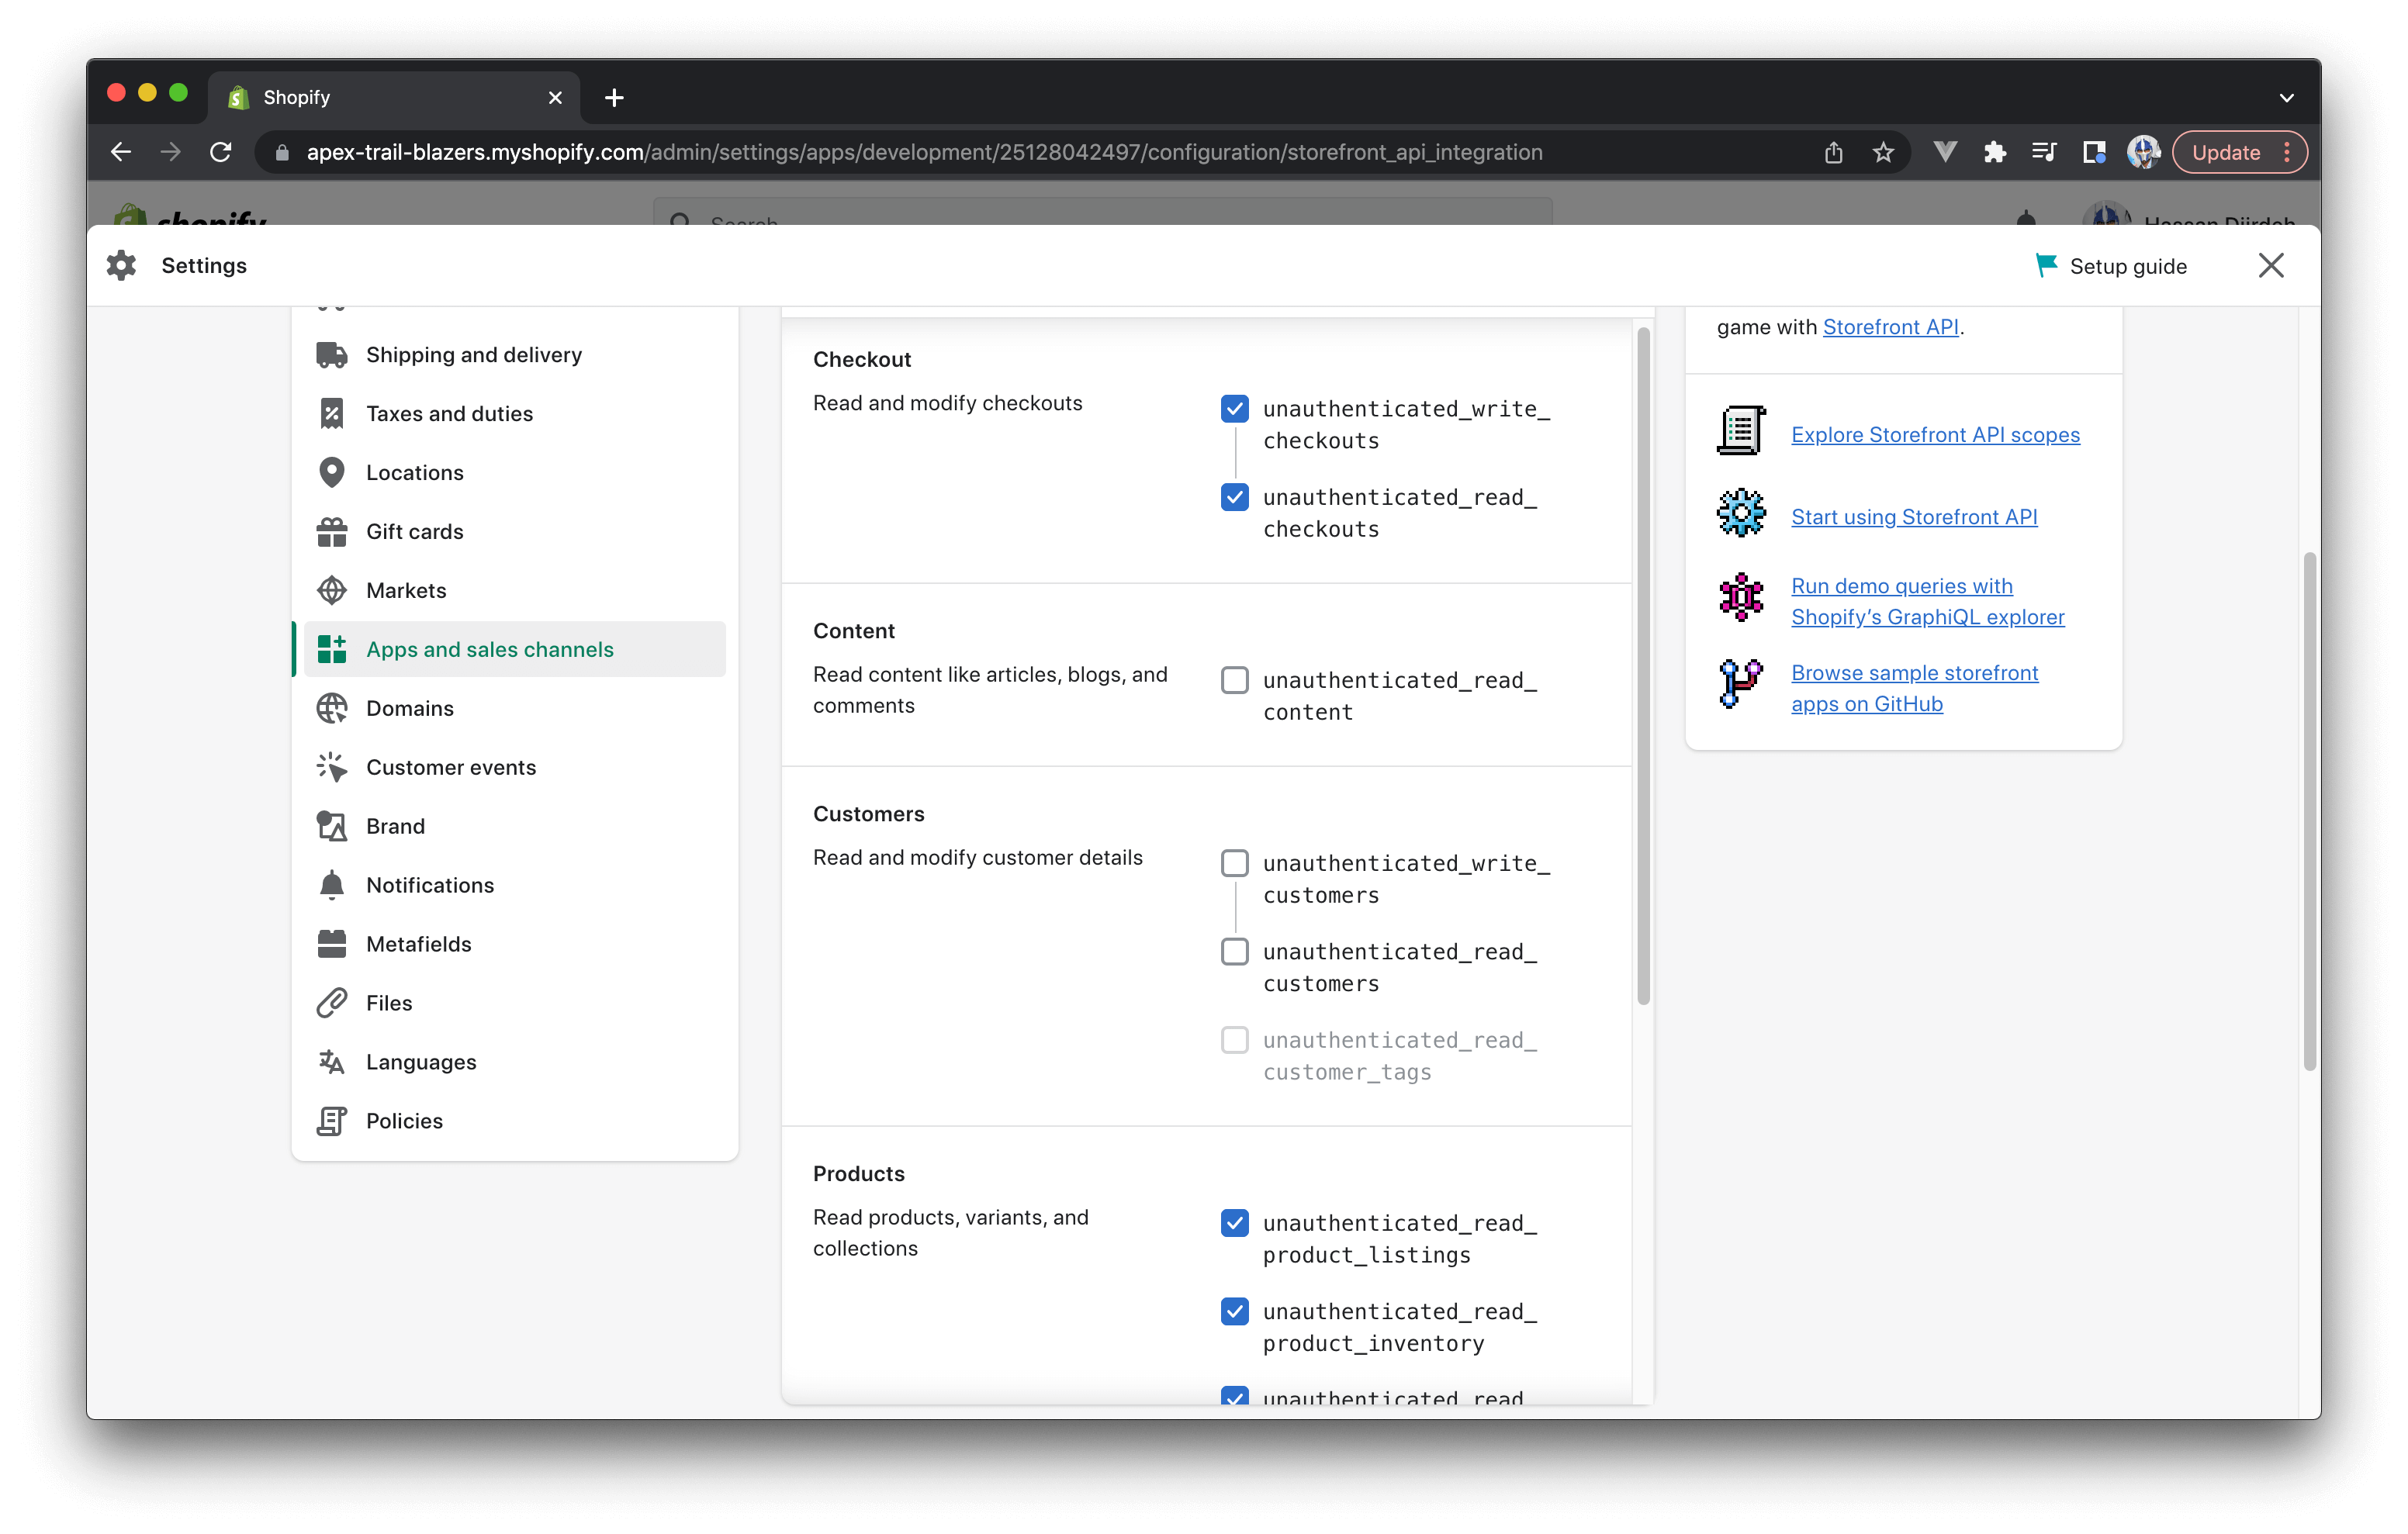
Here is where we’ll be able to authorize our app to access store data. Our Hydrogen app will only need access to two scopes:
Checkout: to initiate the checkout flow from our app.Products: to query product information from our Shopify store.
Though we could be specific in granting specific permissions, we’ll go ahead and enable all the access scopes within Checkout and Products.
Once our access scopes configuration has been saved, we’ll navigate to the “API credentials” tab where we’ll be prompted to install the app to our store to generate access tokens.
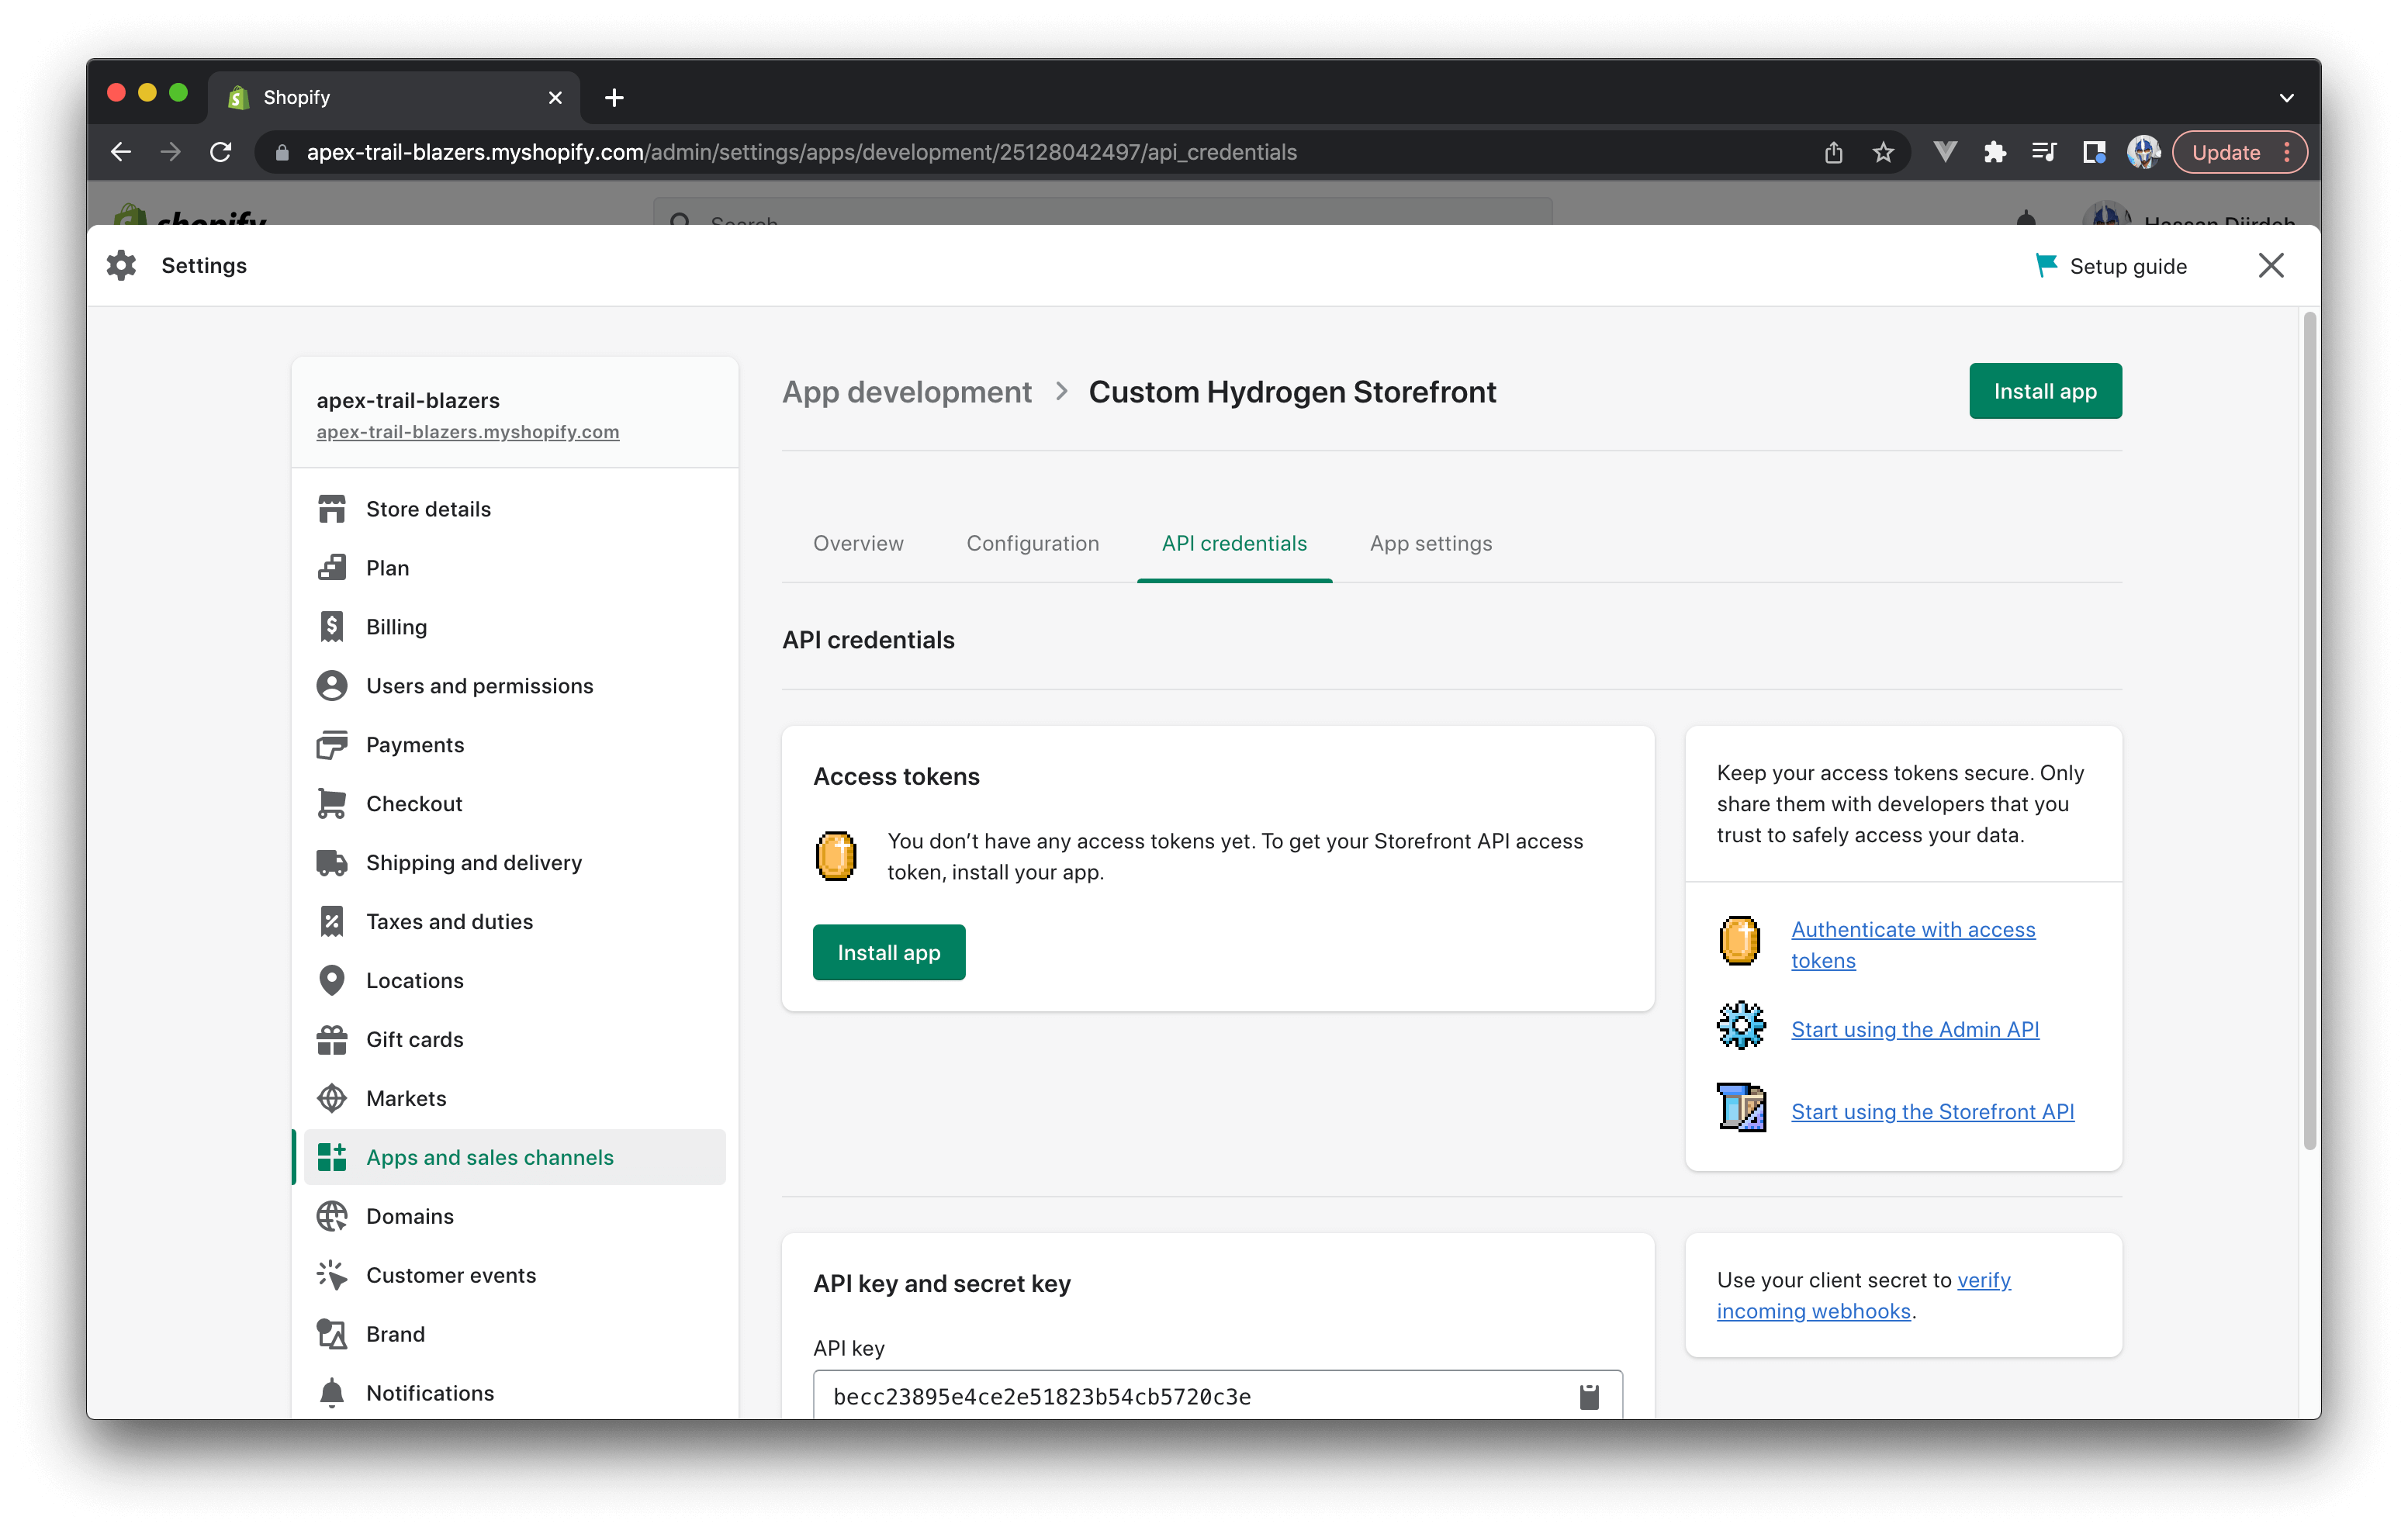
We’ll go ahead and install the app into our store. Once complete, we’ll then be provided with the Storefront API access token.
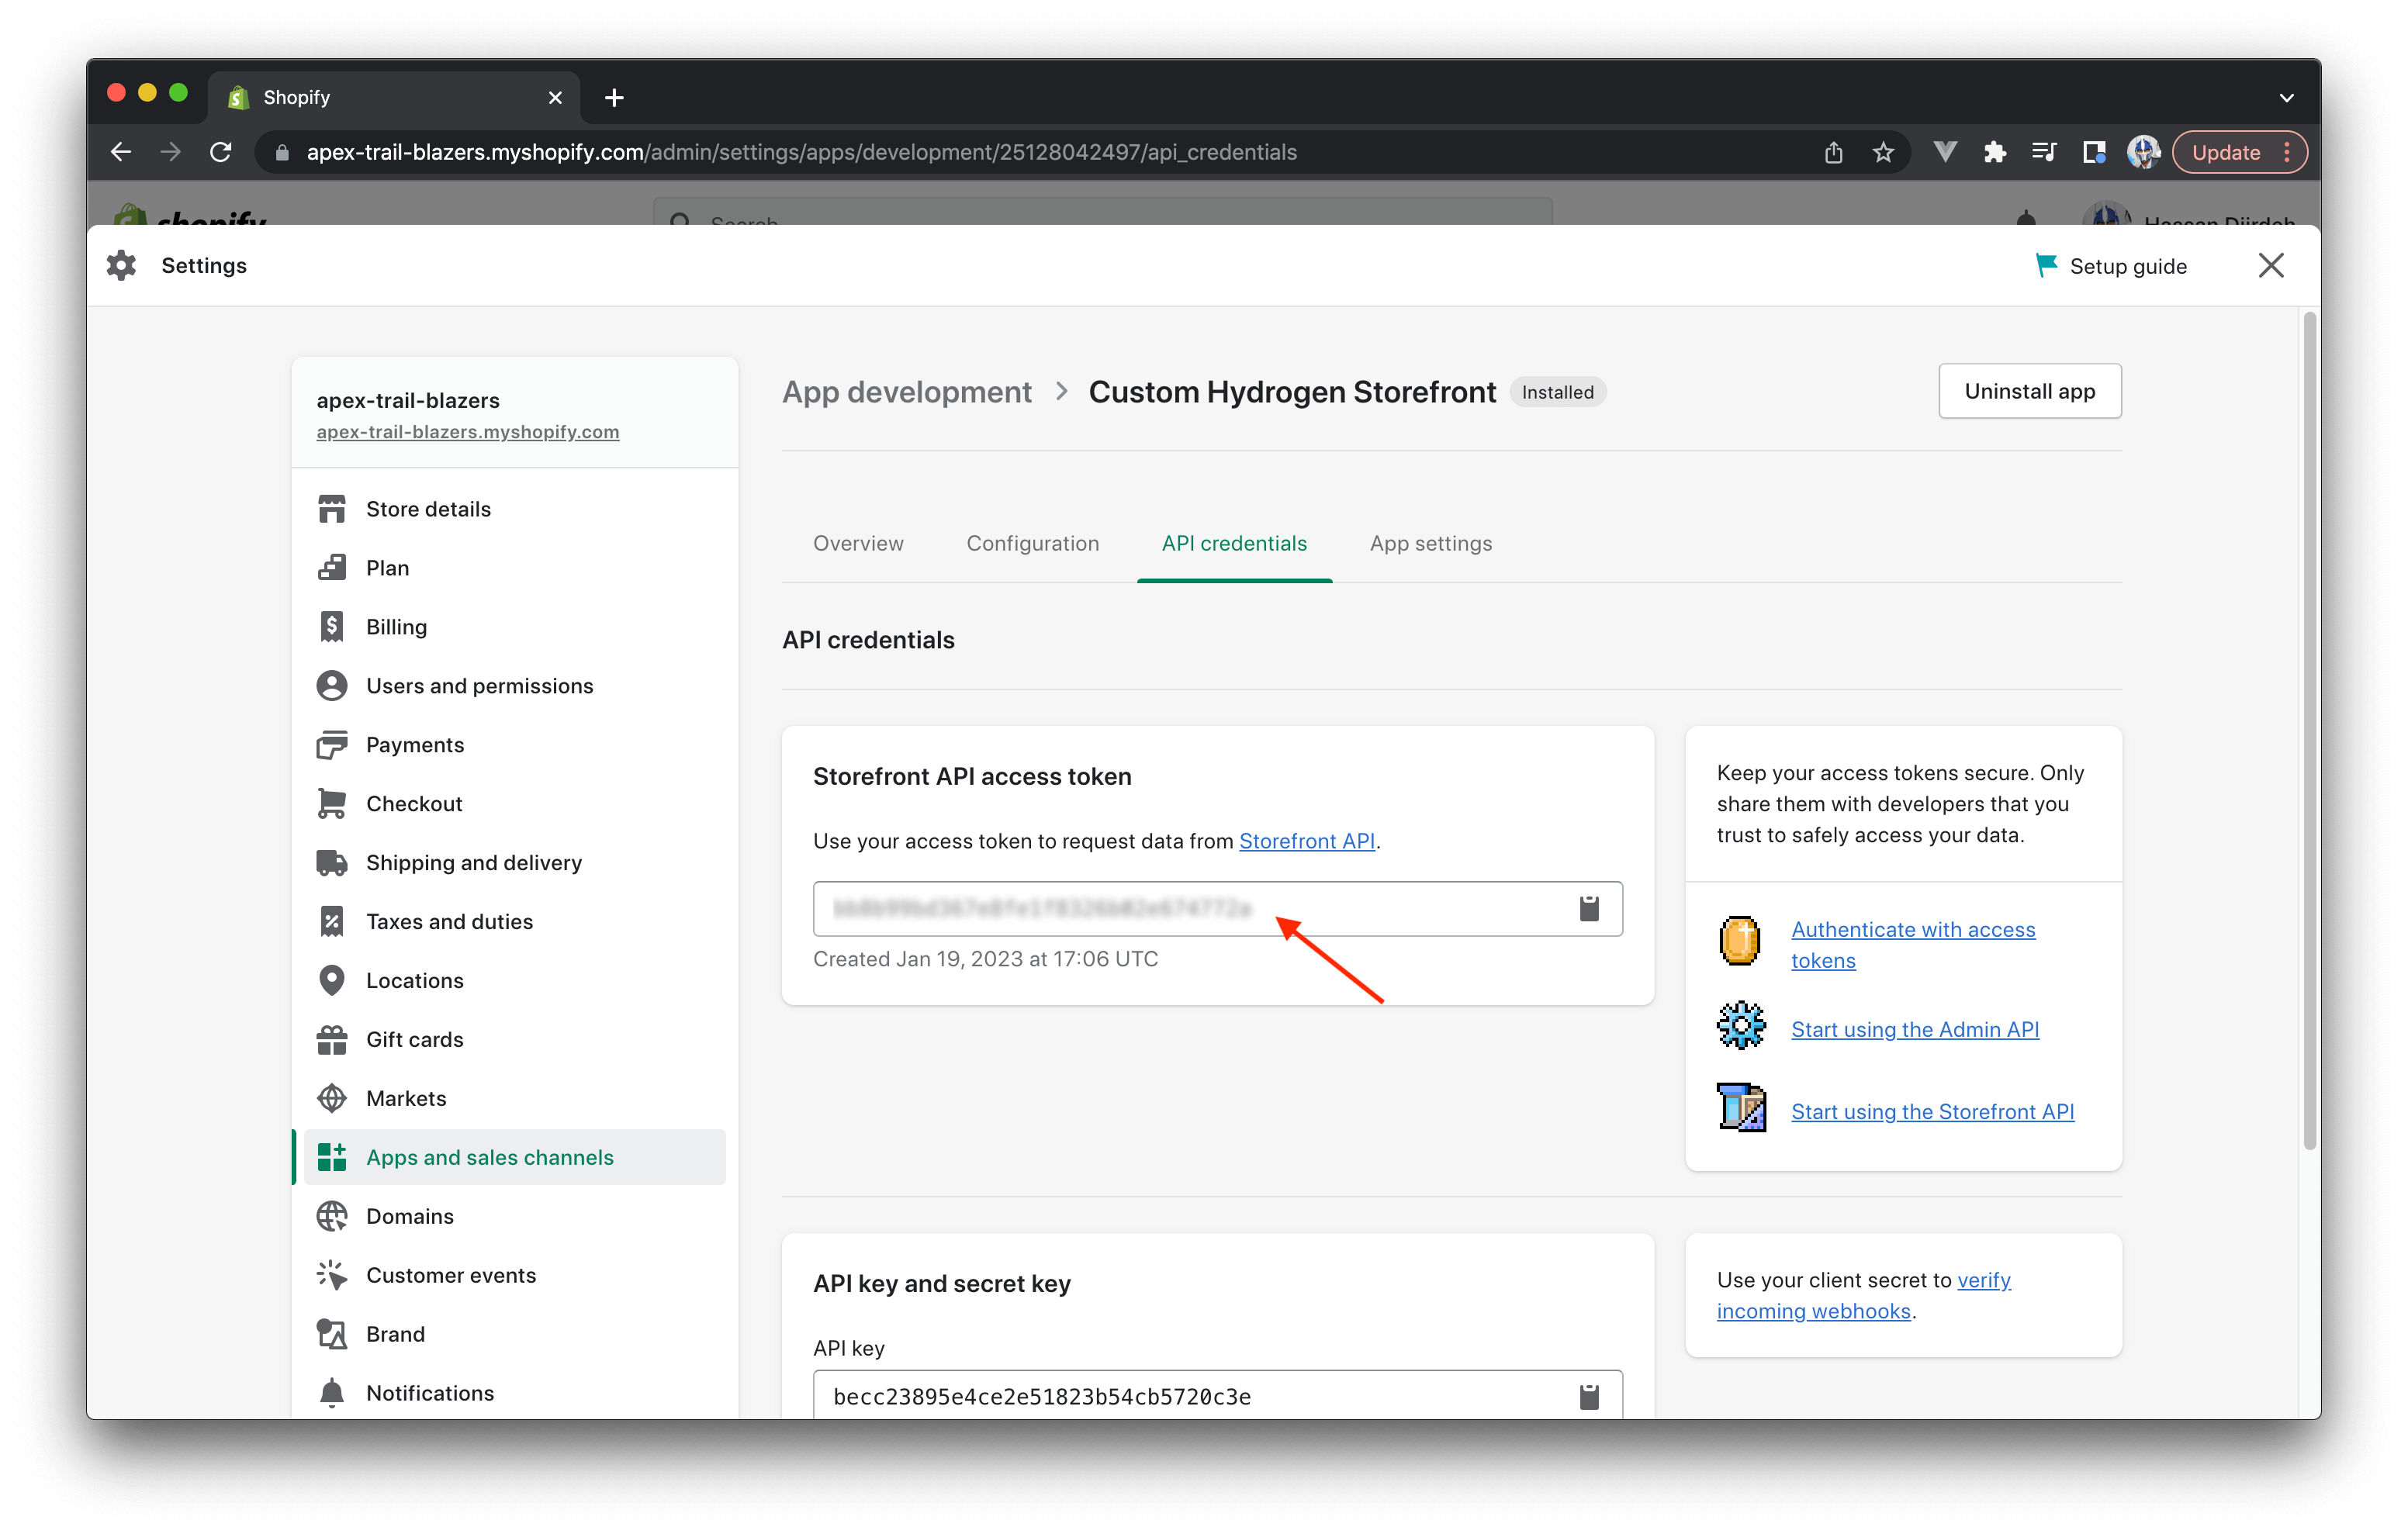
This is the access token that will help authenticate our requests to our store’s GraphQL API. We’ll copy its value and use it in our app’s hydrogen.config.ts file.
Since we wouldn’t want to have this access token kept in our source code and pushed into a remote repository, we’ll place the token value in a new .env file that we’ll
create in the root of our app. We’ll also create another environment variable that will contain the value of our Shopify store URL.
1PUBLIC_STORE_DOMAIN=https://apex-trail-blazers.myshopify.com/2PUBLIC_STOREFRONT_API_TOKEN=XXXXX9bd367e8fe1f8326b02e67XXXXX
We’ll add the .env file to our app’s .gitignore file to ensure it doesn’t get pushed to a remote repository.
1.env2# ...
We’ll then go ahead and update our hydrogen.config.ts file to reference the values of the environment variables we’ve just created.
In Vite, environment variables are exposed in the special import.meta.env object.
1import { defineConfig } from "@shopify/hydrogen/config";23export default defineConfig({4 shopify: {5 storeDomain: import.meta.env.PUBLIC_STORE_DOMAIN,6 storefrontToken: import.meta.env.PUBLIC_STOREFRONT_API_TOKEN,7 storefrontApiVersion: "2022-07",8 },9});
At this moment, our Hydrogen app should successfully be connected to our Shopify store and we can test this out by making a GraphQL query
to our Storefront API. We’ll re-run our server and navigate to http://localhost:3000/graphql which is the Storefront API GraphQL explorer.
Here we can make queries/mutations directly from the explorer to test and interact with the Storefront GraphQL API. To test our store connection, we’ll simply make a
query to gather shop information.
1{2 shop {3 name4 }5}
When the query request completes, we’ll get the name of our shop returned to us.

This tells us our Hydrogen app is successfully connected to our Shopify store!
We’re almost ready to start building the UI of our ecommerce app. However, one last thing left for us to do before we start
writing code is to create the product listing page for our Apex Trail Blazers in our Shopify admin.
Creating the product page in Shopify admin
We’ll want our Hydrogen app to have no context on products/data from our store. Instead we’ll want our app to make requests to our Shopify store to gather information on the product we want to sell. This way, whenever we need to make changes to information about our product, we’ll simply change the product information in our Shopify store. To achieve this, we’ll first need to fill in the relevant product listing in our Shopify store.
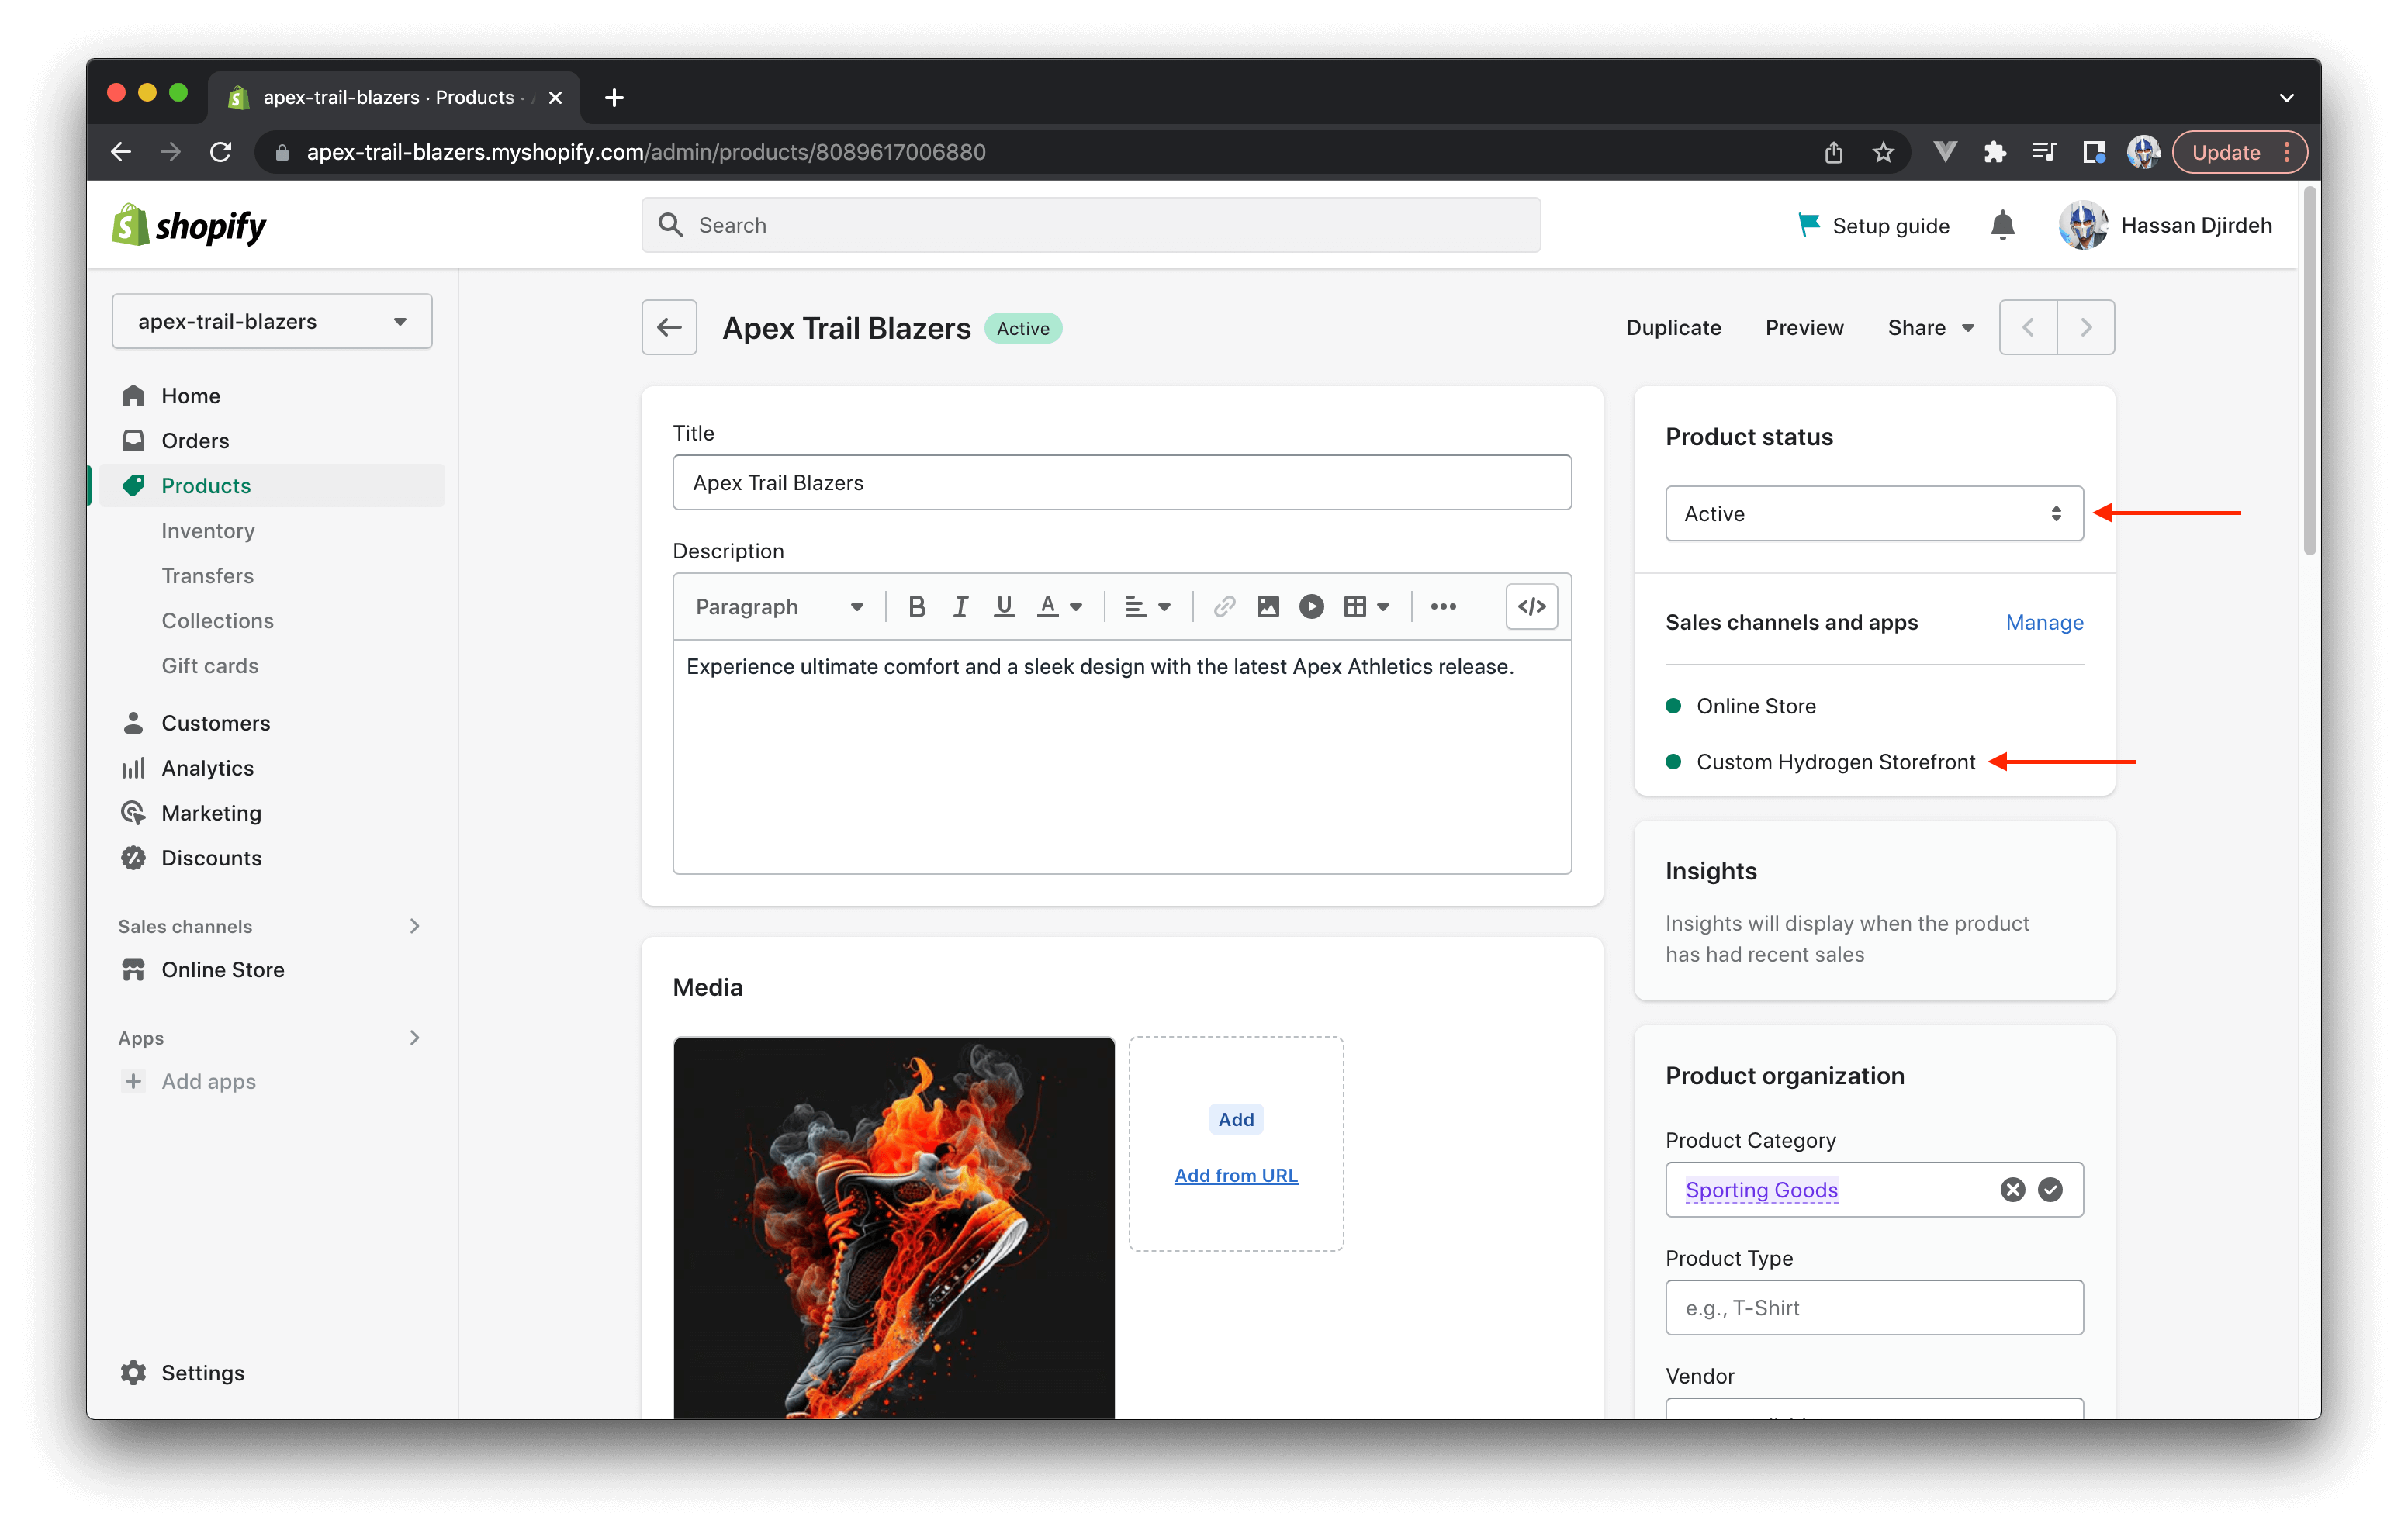
In our Shopify admin, we’ll navigate to the “Products” page and create a new product. Here we’ll add our product with the following information.
- Title: Apex Trail Blazers
- Description: Experience ultimate comfort and a sleek design with the latest Apex Athletics release.
- Media: The product visual we produced with the help of Midjourney.
- Pricing: 0 dollars.
We’ll label the product as “Active” and ensure that its accessible from our recently created “Custom Hydrogen Storefront” custom app.
At this moment, we’ve done all the set-up/configuration we needed! We can now work within our Hydrogen app to create our custom storefront.
Building our Hydrogen app
We’ll focus all of our attention to working within the src/ directory of our Hydrogen app.
As part of our application scaffold, we currently have the following files and directories in the src/ directory.
1src/2 assets/3 favicon.svg4 routes/5 index.server.tsx6 App.server.tsx7 index.css
App.server.tsx is the parent React component of our app and looks like the following:
1import React from "react";2import renderHydrogen from "@shopify/hydrogen/entry-server";3import { Router, FileRoutes, ShopifyProvider } from "@shopify/hydrogen";4import { Suspense } from "react";56function App() {7 return (8 <Suspense fallback={null}>9 <ShopifyProvider>10 <Router>11 <FileRoutes />12 </Router>13 </ShopifyProvider>14 </Suspense>15 );16}1718export default renderHydrogen(App);
The React <Suspense /> component allows us to display a fallback loading component when child components in the tree is still not able to render.
At this moment, the fallback prop is given a value of null so no fallback loading component is to be shown.
The <ShopifyProvider /> component, wrapped over our app components, allows us to access all the functionality Hydrogen provides
within our child components. This includes utilities, hooks, components, etc.
The <Router /> component provides context for routing in our app.
The <FileRoutes /> component helps build Hydrogen routes. The
current declaration of <FileRoutes /> states that the component being exported in the src/routes/index.server.tsx file is to be rendered
in the base path of our app (/).
With that said, let’s now navigate to the <Home /> component being rendered in the routes/index.server.tsx file.
1export default function Home() {2 return <div>Hello World</div>;3}
Our first goal will be to query our Shopify store for the product listing we’ve created and attempt to render some information of that
product listing in our component. The Storefront API provides us with a product query
with which we’re able to return information about a certain product.
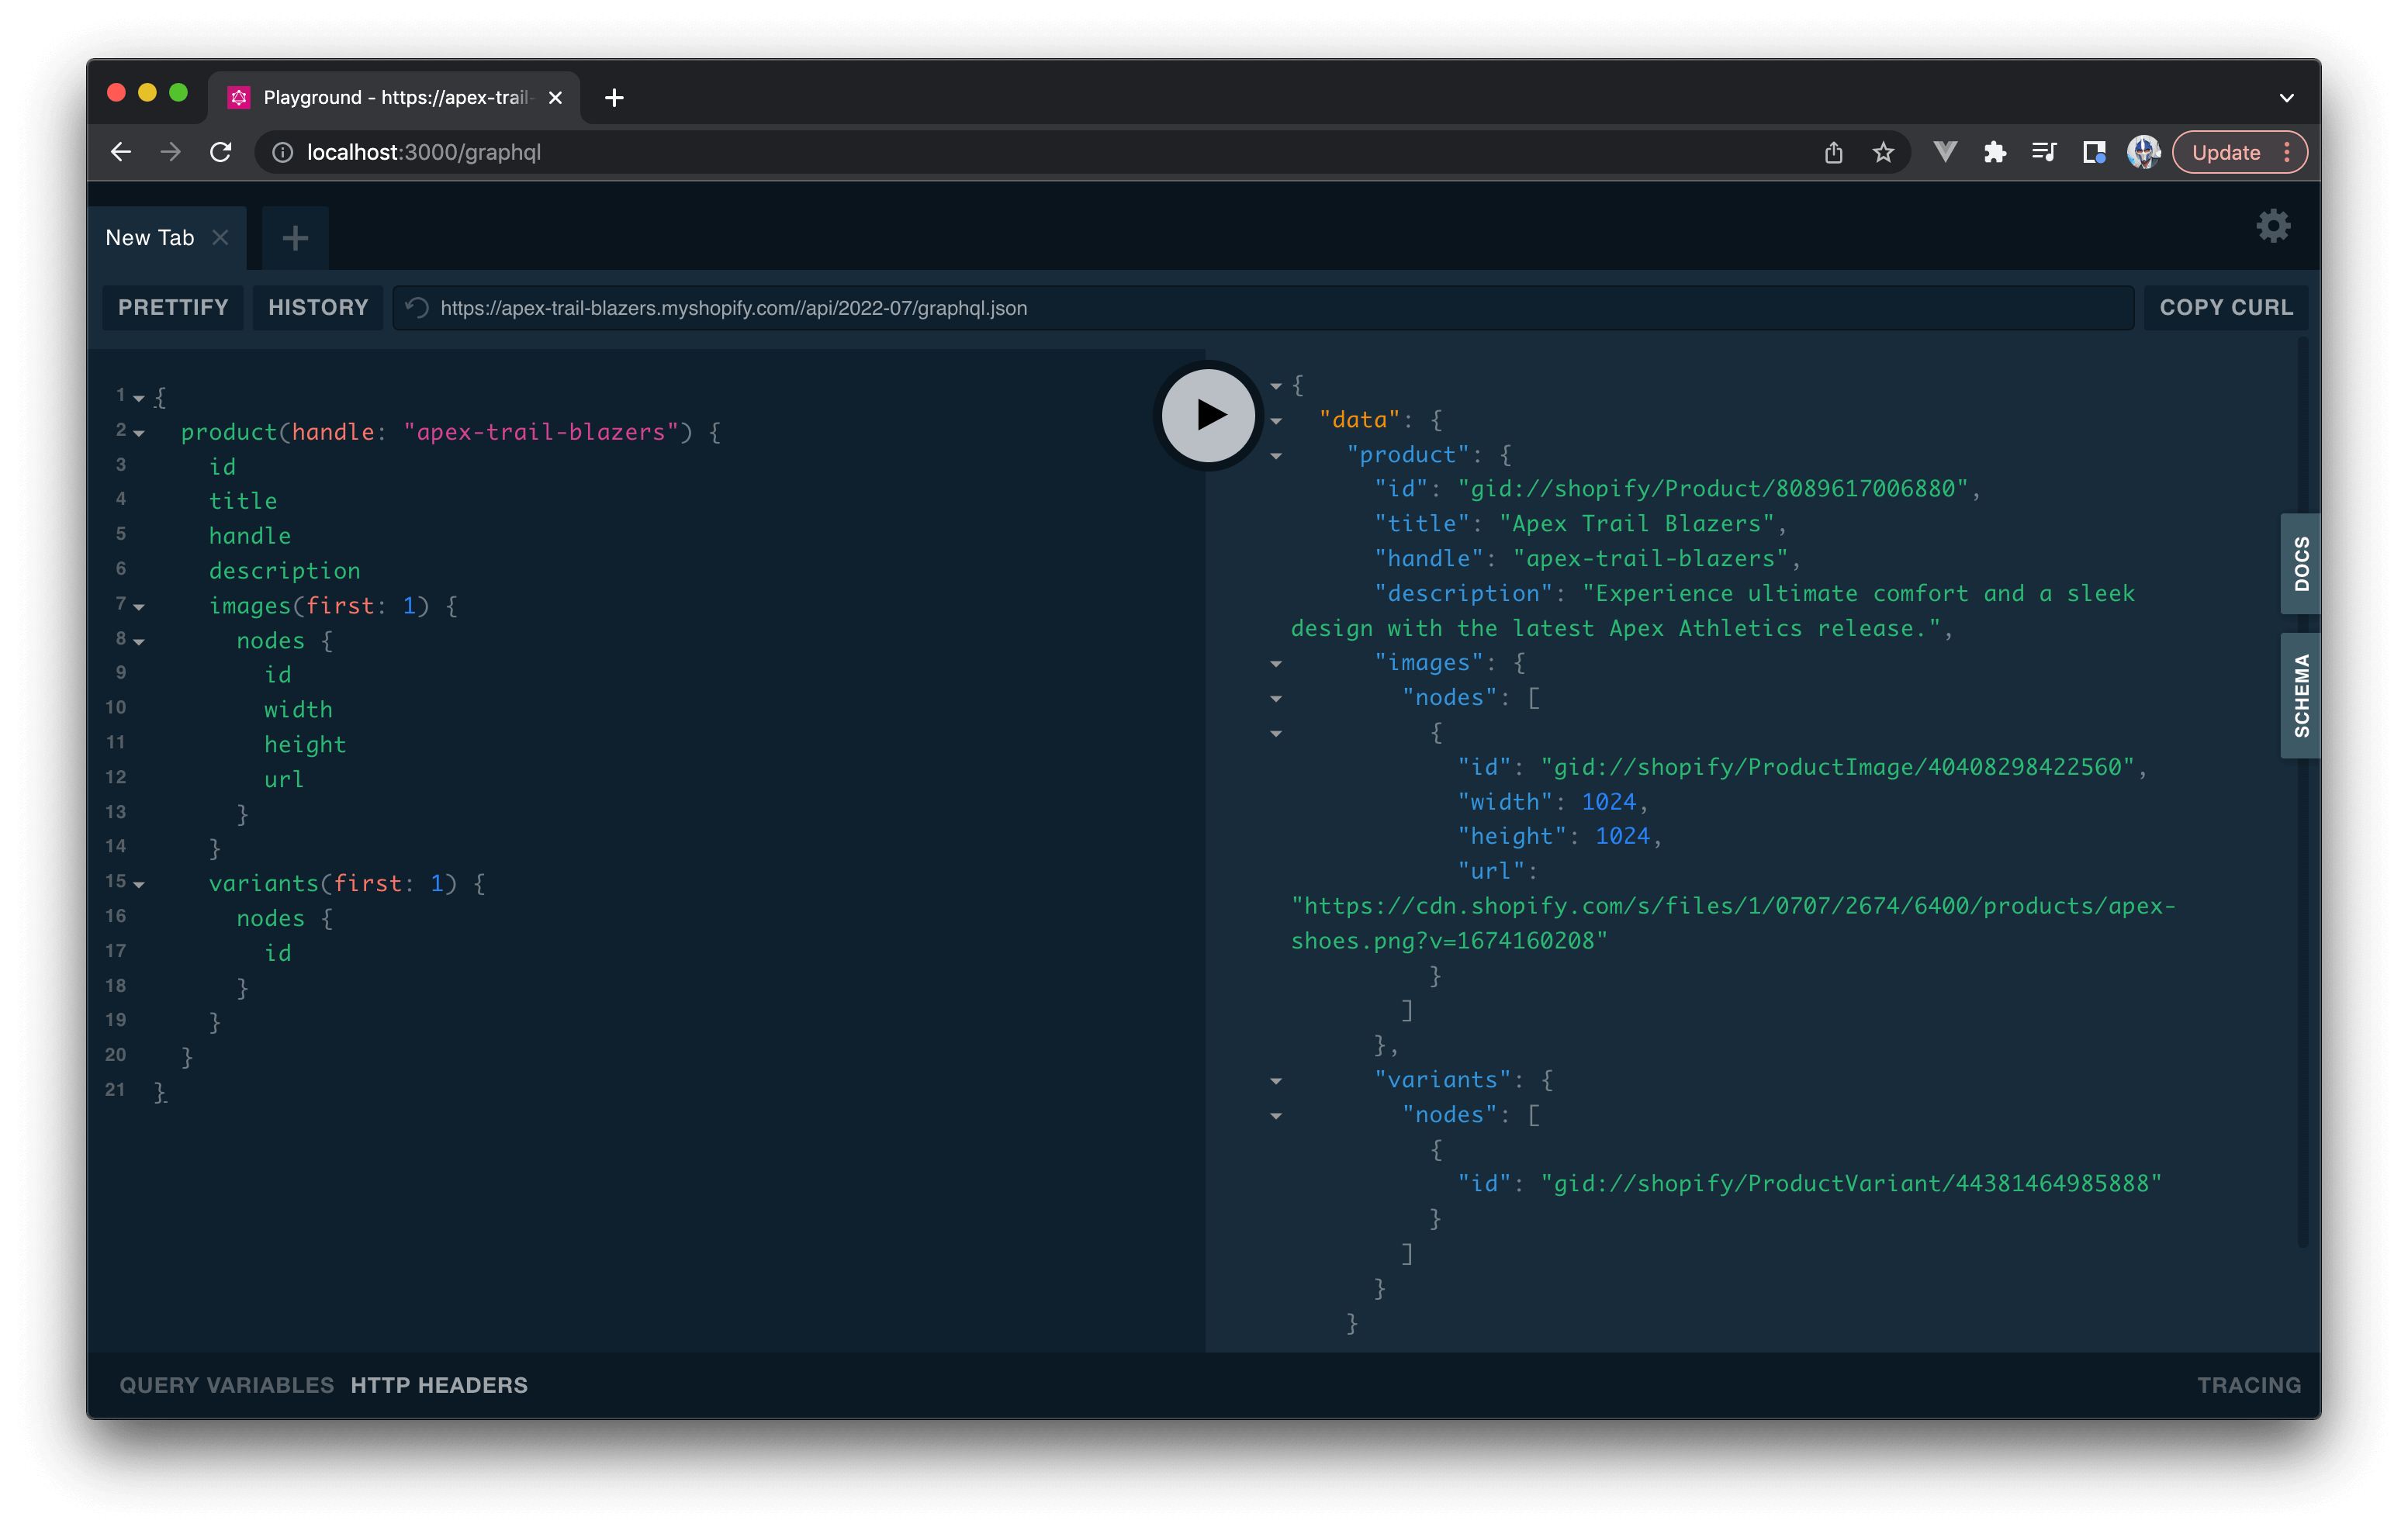
We can test this in our GraphQL playground and look to query all the information we’ll need for the product that we’ve recently created (handle: apex-trail-blazers).
1{2 product(handle: "apex-trail-blazers") {3 id4 title5 handle6 description7 images(first: 1) {8 nodes {9 id10 width11 height12 url13 }14 }15 variants(first: 1) {16 nodes {17 id18 }19 }20 }21}
When running the above query in GraphQL playground, we’ll see the relevant product information we’re looking for returned to us.
Let’s look to make this same query from our <Home /> component. We’ll import the gql utility from @shopify/hydrogen and
construct our query in a constant labeled QUERY.
1import { gql } from "@shopify/hydrogen";23const QUERY = gql`4 query Product {5 product(id: "gid://shopify/Product/8094887018782") {6 id7 title8 handle9 description10 images(first: 1) {11 nodes {12 id13 width14 height15 url16 }17 }18 variants(first: 1) {19 nodes {20 id21 }22 }23 }24 }25`;2627export default function Home() {28 return <div>Hello World</div>;29}
Next, we’ll look to have our component make the query with the useShopQuery() Hook available to
us from the Hydrogen library.
1import { gql, useShopQuery } from "@shopify/hydrogen";
We’ll use the Hook in our component and provide the query we’ve created as the value of the query field in the options the Hook accepts. We’ll destruct the product object from
the data object that is to be returned from our Hook.
To test whether our query is being made successfully, we’ll look to have the component render the product title in its markup.
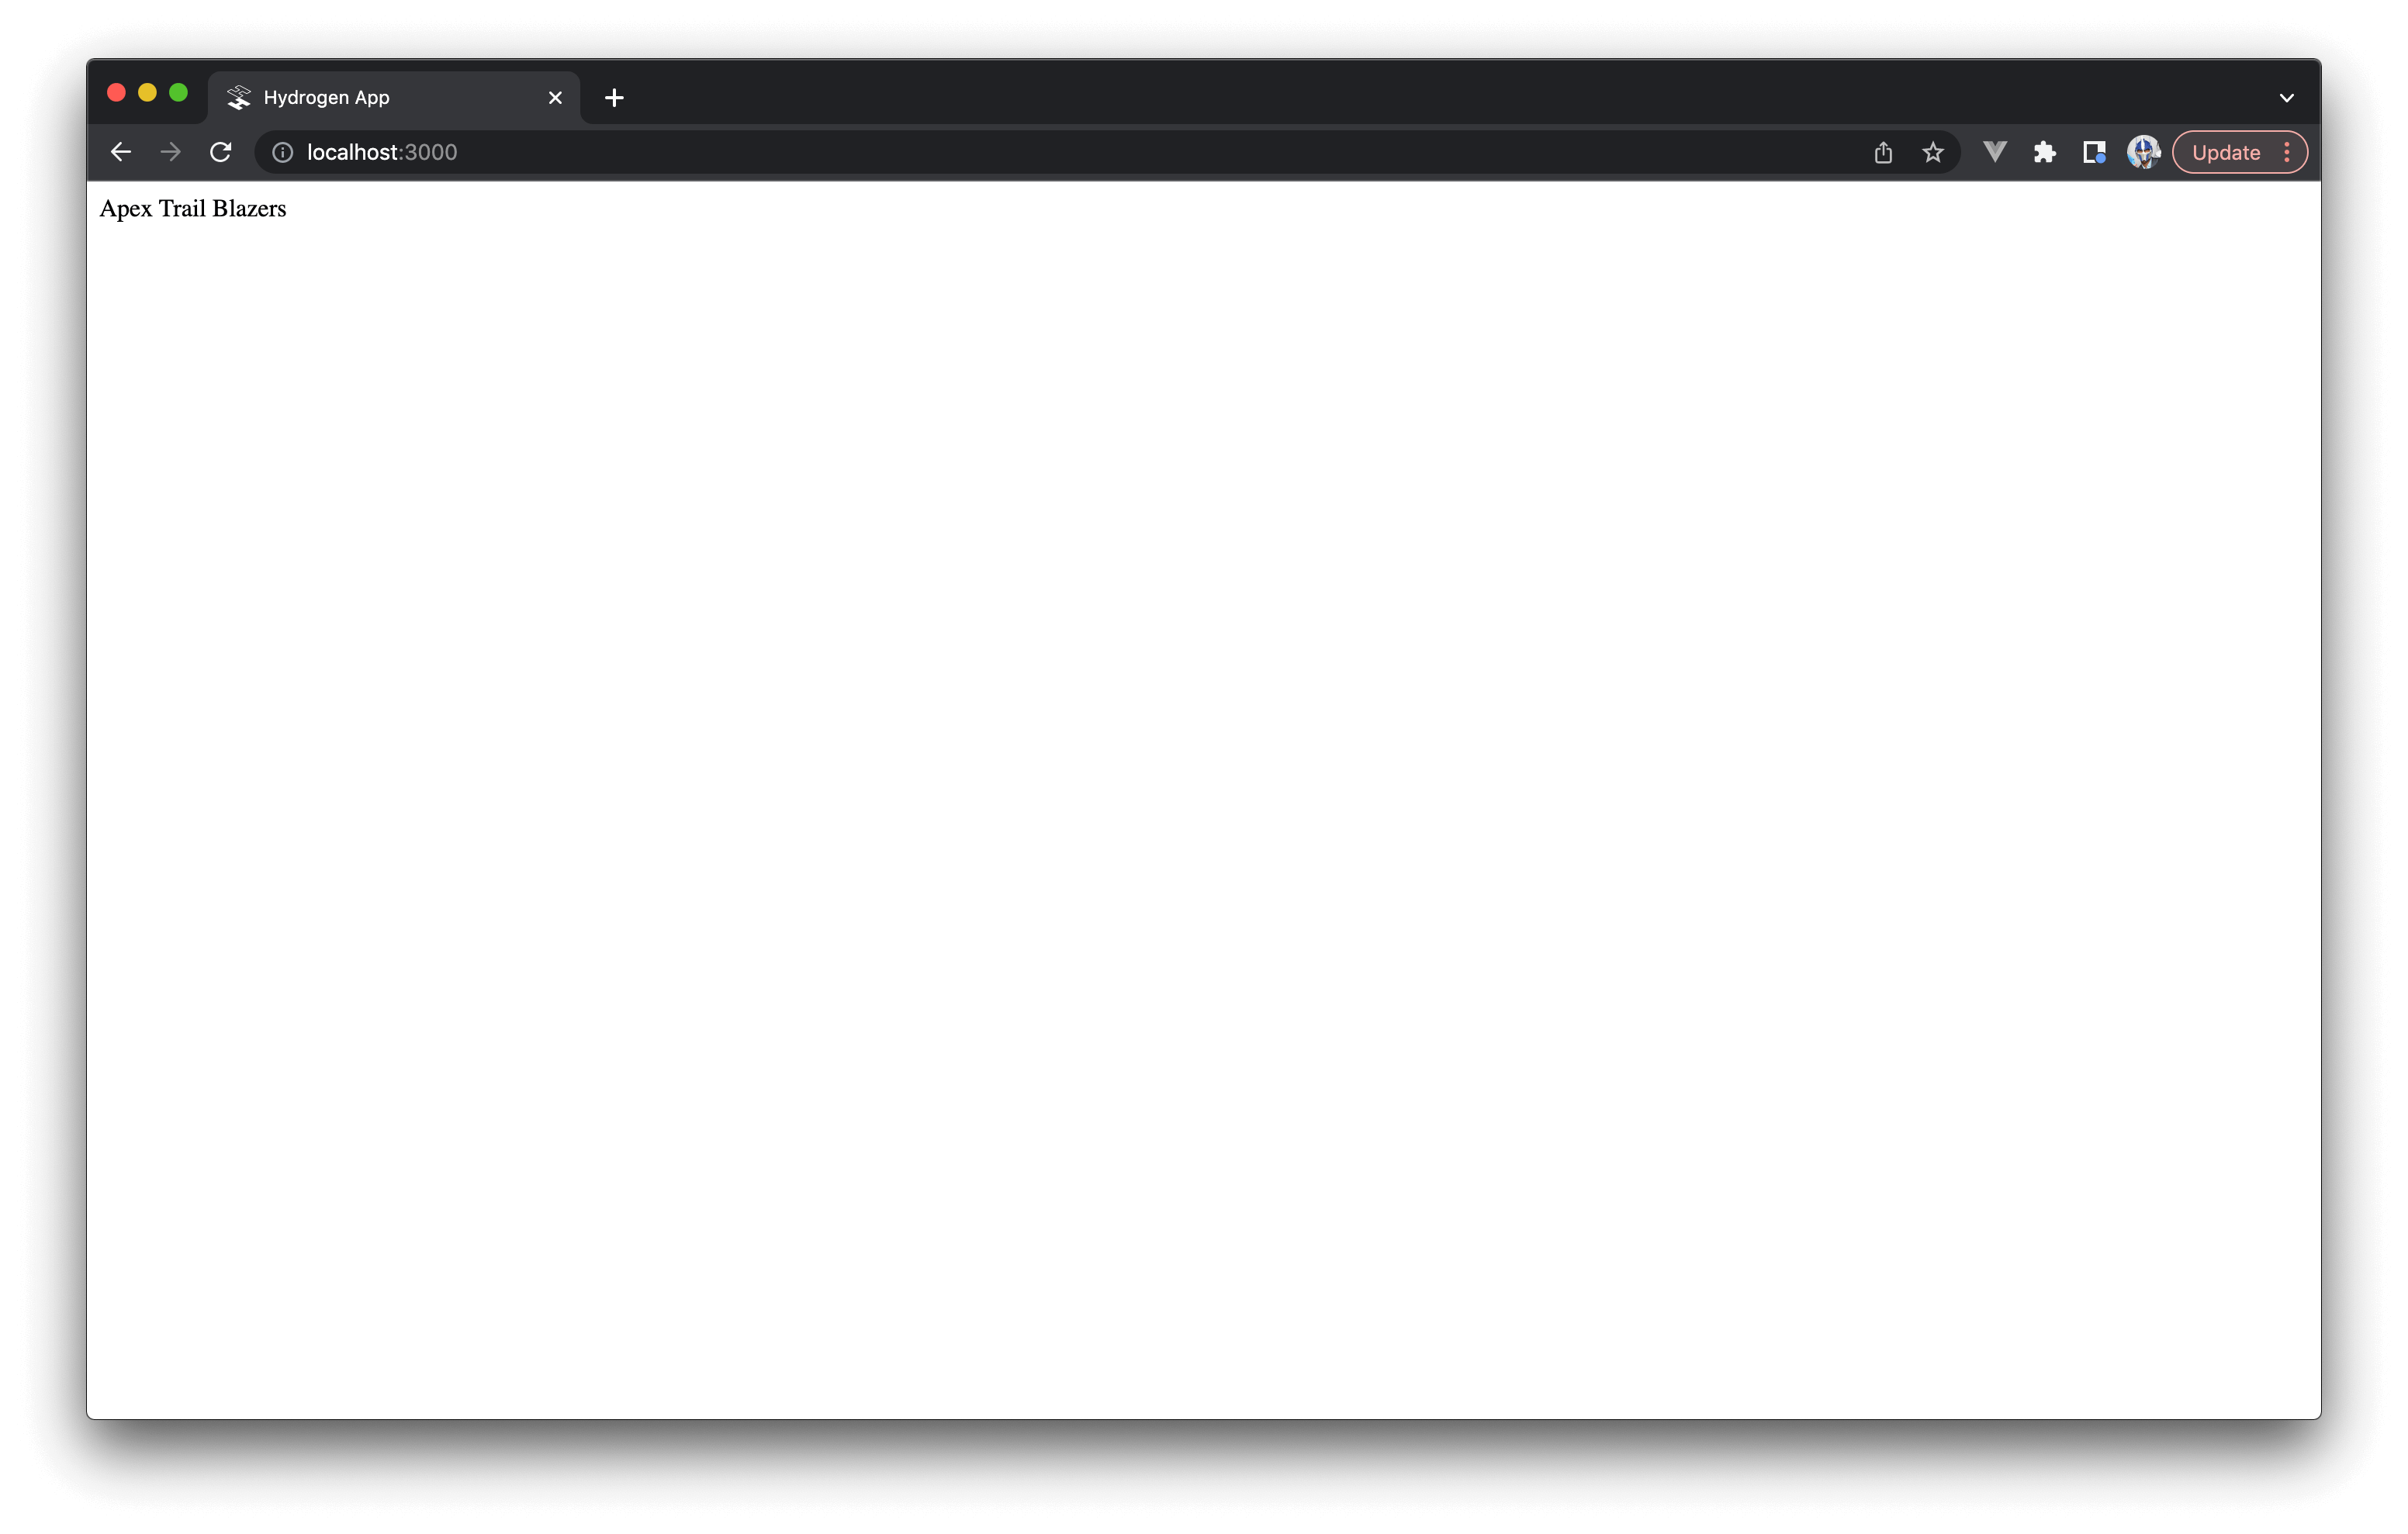
1import { gql, useShopQuery } from "@shopify/hydrogen";23const QUERY = gql`4 query Product {5 product(handle: "apex-trail-blazers") {6 id7 title8 handle9 description10 images(first: 1) {11 nodes {12 id13 width14 height15 url16 }17 }18 variants(first: 1) {19 nodes {20 id21 }22 }23 }24 }25`;2627export default function Home() {28 const {29 data: { product },30 } = useShopQuery({31 query: QUERY,32 });3334 return <div>{product.title}</div>;35}
When saving our changes and navigating to http://localhost:3000/, we’ll now see the product title be rendered in our app.
Installing Tailwind
As we build our ecommerce page, we’ll leverage Tailwind CSS, a CSS framework, to help provide additional styling into our app. We’ll follow the steps listed in the Getting Started section of the Hydrogen documentation to install Tailwind into our app.
We’ll first exit the running server and run the following command to install tailwindcss and its peer dependencies.
1yarn add tailwindcss @tailwindcss/typography postcss autoprefixer
We’ll then run the following to autogenerate a tailwind.config.js file that will allow us to configure the use of Tailwind in our app.
1yarn tailwindcss init -p
In the newly created tailwind.config.js file, we’ll add the following to specify the paths to our app’s template files.
1module.exports = {2 content: ["./index.html", "./src/**/*.{js,jsx,ts,tsx}"],3 theme: {4 extend: {},5 },6 plugins: [require("@tailwindcss/typography")],7};
We’ll also specify a few custom theme colors (black, white, and orange) that we’ll use in building our page.
1module.exports = {2 content: ["./index.html", "./src/**/*.{js,jsx,ts,tsx}"],3 theme: {4 extend: {},5 colors: {6 black: "#181817",7 white: "#FFFFFF",8 orange: "#FE1B06",9 },10 },11 plugins: [require("@tailwindcss/typography")],12};
Lastly, we’ll add the relevant Tailwind directives to the src/index.css file.
1@tailwind base;2@tailwind components;3@tailwind utilities;
We’ll restart the server and now move towards building the markup of our page.
Writing the markup
Prior to building the markup of our <Home /> component, we’ll obtain the description and image we’ll need from the product object available to us.
1import { gql, useShopQuery } from "@shopify/hydrogen";23const QUERY = /* ... */45export default function Home() {6 const {7 data: { product },8 } = useShopQuery({9 query: QUERY,10 });1112 const { description, images } = product;13 const productImage = images.nodes[0].url;1415 return <div>{product.title}</div>;16}
We’ll update the markup of our component to render two columns within a grid that is placed in a black background. We’ll do this while leveraging the utility classes available to us from Tailwind.
1import { gql, useShopQuery } from "@shopify/hydrogen";23const QUERY = /* ... */45export default function Home() {6 const {7 data: { product },8 } = useShopQuery({9 query: QUERY,10 });1112 const { description, images } = product;13 const productImage = images.nodes[0].url;1415return (16 <div className="bg-black h-screen">17 <div className="h-full container mx-auto content-center grid grid-cols-1 md:grid-cols-2">18 <div className="flex flex-col justify-center text-white text-center md:text-left">19 {/* Column 1 */}20 </div>21 <div className="flex justify-center">22 {/* Column 2 */}23 </div>24 </div>25 </div>26 );27}
Tailwind UI is a UI framework that provides many different CSS components and templates. In addition to this, the framework provides a wide range of utility classes that can be used to quickly and easily add styling to a page. As we build our markup, we won’t explain each utility class being used.
If you’re interested in learning more about the specific classes we’re using, we recommend checking out the Tailwind CSS documentation.
We’ll now populate each column within the grid.
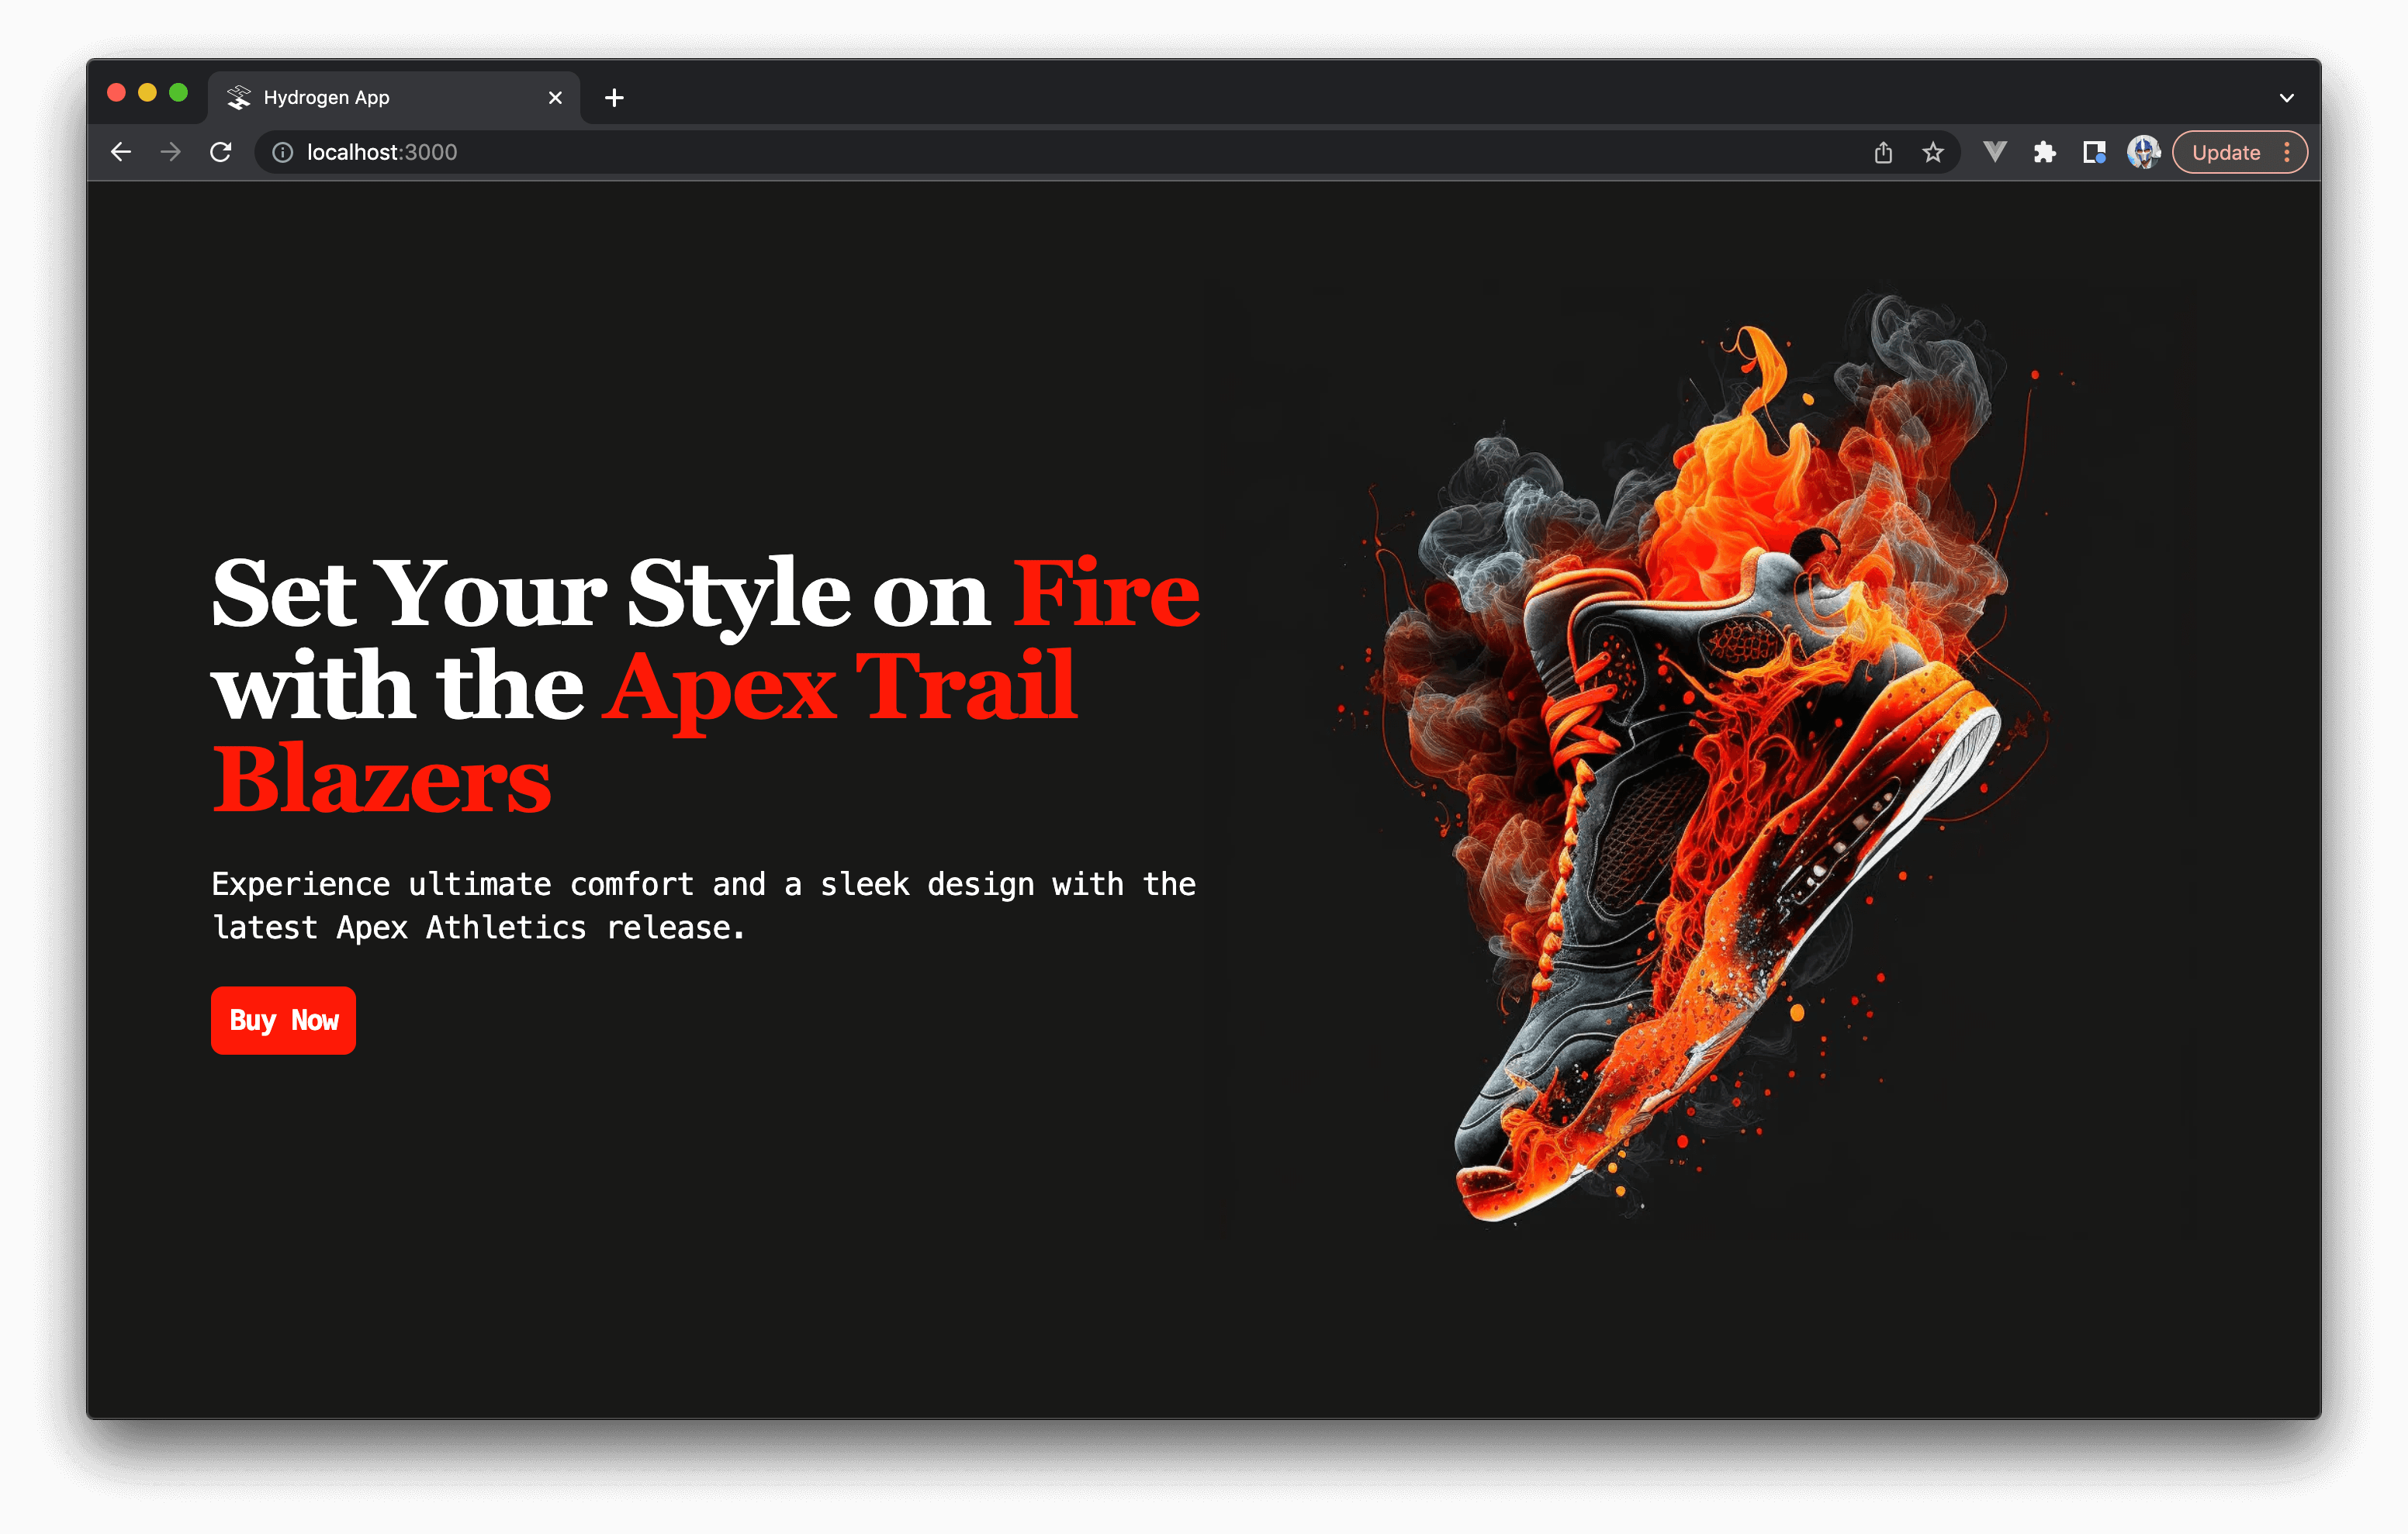
- In the first column, we’ll add the custom title (“Set your Style on Fire with the Apex Trail Blazers”), the product description, and “Buy Now” button.
- In the second column, we’ll render the
productImage.
This will have our markup be updated to look like the following.
1import { gql, useShopQuery } from "@shopify/hydrogen";23const QUERY = /* ... */45export default function Home() {6 const {7 data: { product },8 } = useShopQuery({9 query: QUERY,10 });1112 const { description, images } = product;13 const productImage = images.nodes[0].url;1415return (16 <div className="bg-black h-screen">17 <div className="h-full container mx-auto content-center grid grid-cols-1 md:grid-cols-2">18 <div className="flex flex-col justify-center text-white text-center md:text-left">19 <h1 className="font-serif tracking-tight font-bold text-4xl md:text-5xl lg:text-6xl">20 Set Your Style on <span className="text-orange">Fire</span> with the{" "}21 <span className="text-orange">Apex Trail Blazers</span>22 </h1>23 <p className="font-mono tracking-tight mt-6 leading-8 text-md md:text-lg lg:text-xl">24 {description}25 </p>26 <div className="mt-6">27 <button className="px-3 py-2 mb-5 md:mb-0 font-mono tracking-tighter font-semibold bg-orange text-white rounded-lg shadow-sm text-sm md:text-md lg:text-lg">28 Buy Now29 </button>30 </div>31 </div>32 <div className="flex justify-center">33 <div className="m-auto">34 <img35 className="h-80 md:h-96 lg:h-[32rem] xl:h-[42rem]"36 src={productImage}37 />38 </div>39 </div>40 </div>41 </div>42 );43}
When our changes have been saved, we’ll be able to see our app styled and presented the way we designed.
Initiating the Checkout flow
We’ll want to have the user initiate the Shopify checkout flow when they click the “Buy Now” button. We can do this by triggering a mutation, from the Storefront API, like checkoutCreate to create
a new checkout process. However, the simplest way we can achieve checkout for our use case is by using the <BuyNowButton /> component available
to us from Hydrogen. The <BuyNowButton /> component renders a button that when clicked adds a product item to the cart and navigates the user to the checkout page.
We’ll first import the <BuyNowButton /> component from the Hydrogen library.
1import { gql, useShopQuery, BuyNowButton } from "@shopify/hydrogen";
And we’ll use it in place of the traditional <button /> element we used earlier for our call to action.
1import { gql, useShopQuery, BuyNowButton } from "@shopify/hydrogen";23const QUERY = /* ... */45export default function Home() {6 const {7 data: { product },8 } = useShopQuery({9 query: QUERY,10 });1112 const { description, images } = product;13 const productImage = images.nodes[0].url;1415return (16 <div className="bg-black h-screen">17 <div className="h-full container mx-auto content-center grid grid-cols-1 md:grid-cols-2">18 <div className="flex flex-col justify-center text-white text-center md:text-left">19 {/* ... */}20 <div className="mt-6">21 <BuyNowButton className="px-3 py-2 mb-5 md:mb-0 font-mono tracking-tighter font-semibold bg-orange text-white rounded-lg shadow-sm text-sm md:text-md lg:text-lg">22 Buy Now23 </BuyNowButton>24 </div>25 </div>26 <div className="flex justify-center">27 {/* ... */}28 </div>29 </div>30 </div>31 );32}
For the <BuyNowButton /> component to add a product item and initiate checkout, we’ll need to provide
values for the quantity and variantId props it accepts. In our GraphQL query, we’re already querying for the variants field of our product query.
Since we know that we only have one variant for our product in our store, we’ve told our query to only return the first variant in the paginated variants list.
1const QUERY = gql`2 query Product {3 product(handle: "apex-trail-blazers") {4 ...5 variants(first: 1) {6 nodes {7 id8 }9 }10 }11 }12`;
In our <Home /> component, we’ll need to simply retrieve the variants field and access the id of the first variant object in the list.
1import { gql, useShopQuery, BuyNowButton } from "@shopify/hydrogen";23const QUERY = /* ... */45export default function Home() {6 const {7 data: { product },8 } = useShopQuery({9 query: QUERY,10 });1112 const { description, images, variants } = product;13 const productImage = images.nodes[0].url;1415 // obtaining the product variant id16 const productVariantId = variants.nodes[0].id;1718 return (19 /* ... */20 );21}
We’ll provide the queried product variant id as the value to the variantId prop of the <BuyNowButton /> component. We’ll specify a value
of 1 for quantity.
1import { gql, useShopQuery, BuyNowButton } from "@shopify/hydrogen";23const QUERY = /* ... */45export default function Home() {6 const {7 data: { product },8 } = useShopQuery({9 query: QUERY,10 });1112 const { description, images } = product;13 const productImage = images.nodes[0].url;1415 return (16 <div className="bg-black h-screen">17 <div className="h-full container mx-auto content-center grid grid-cols-1 md:grid-cols-2">18 <div className="flex flex-col justify-center text-white text-center md:text-left">19 {/* ... */}20 <div className="mt-6">21 <BuyNowButton22 quantity={1}23 variantId={productVariantId}24 className="px-3 py-2 mb-5 md:mb-0 font-mono tracking-tighter font-semibold bg-orange text-white rounded-lg shadow-sm text-sm md:text-md lg:text-lg"25 >26 Buy Now27 </BuyNowButton>28 </div>29 </div>30 <div className="flex justify-center">31 {/* ... */}32 </div>33 </div>34 </div>35 );36}
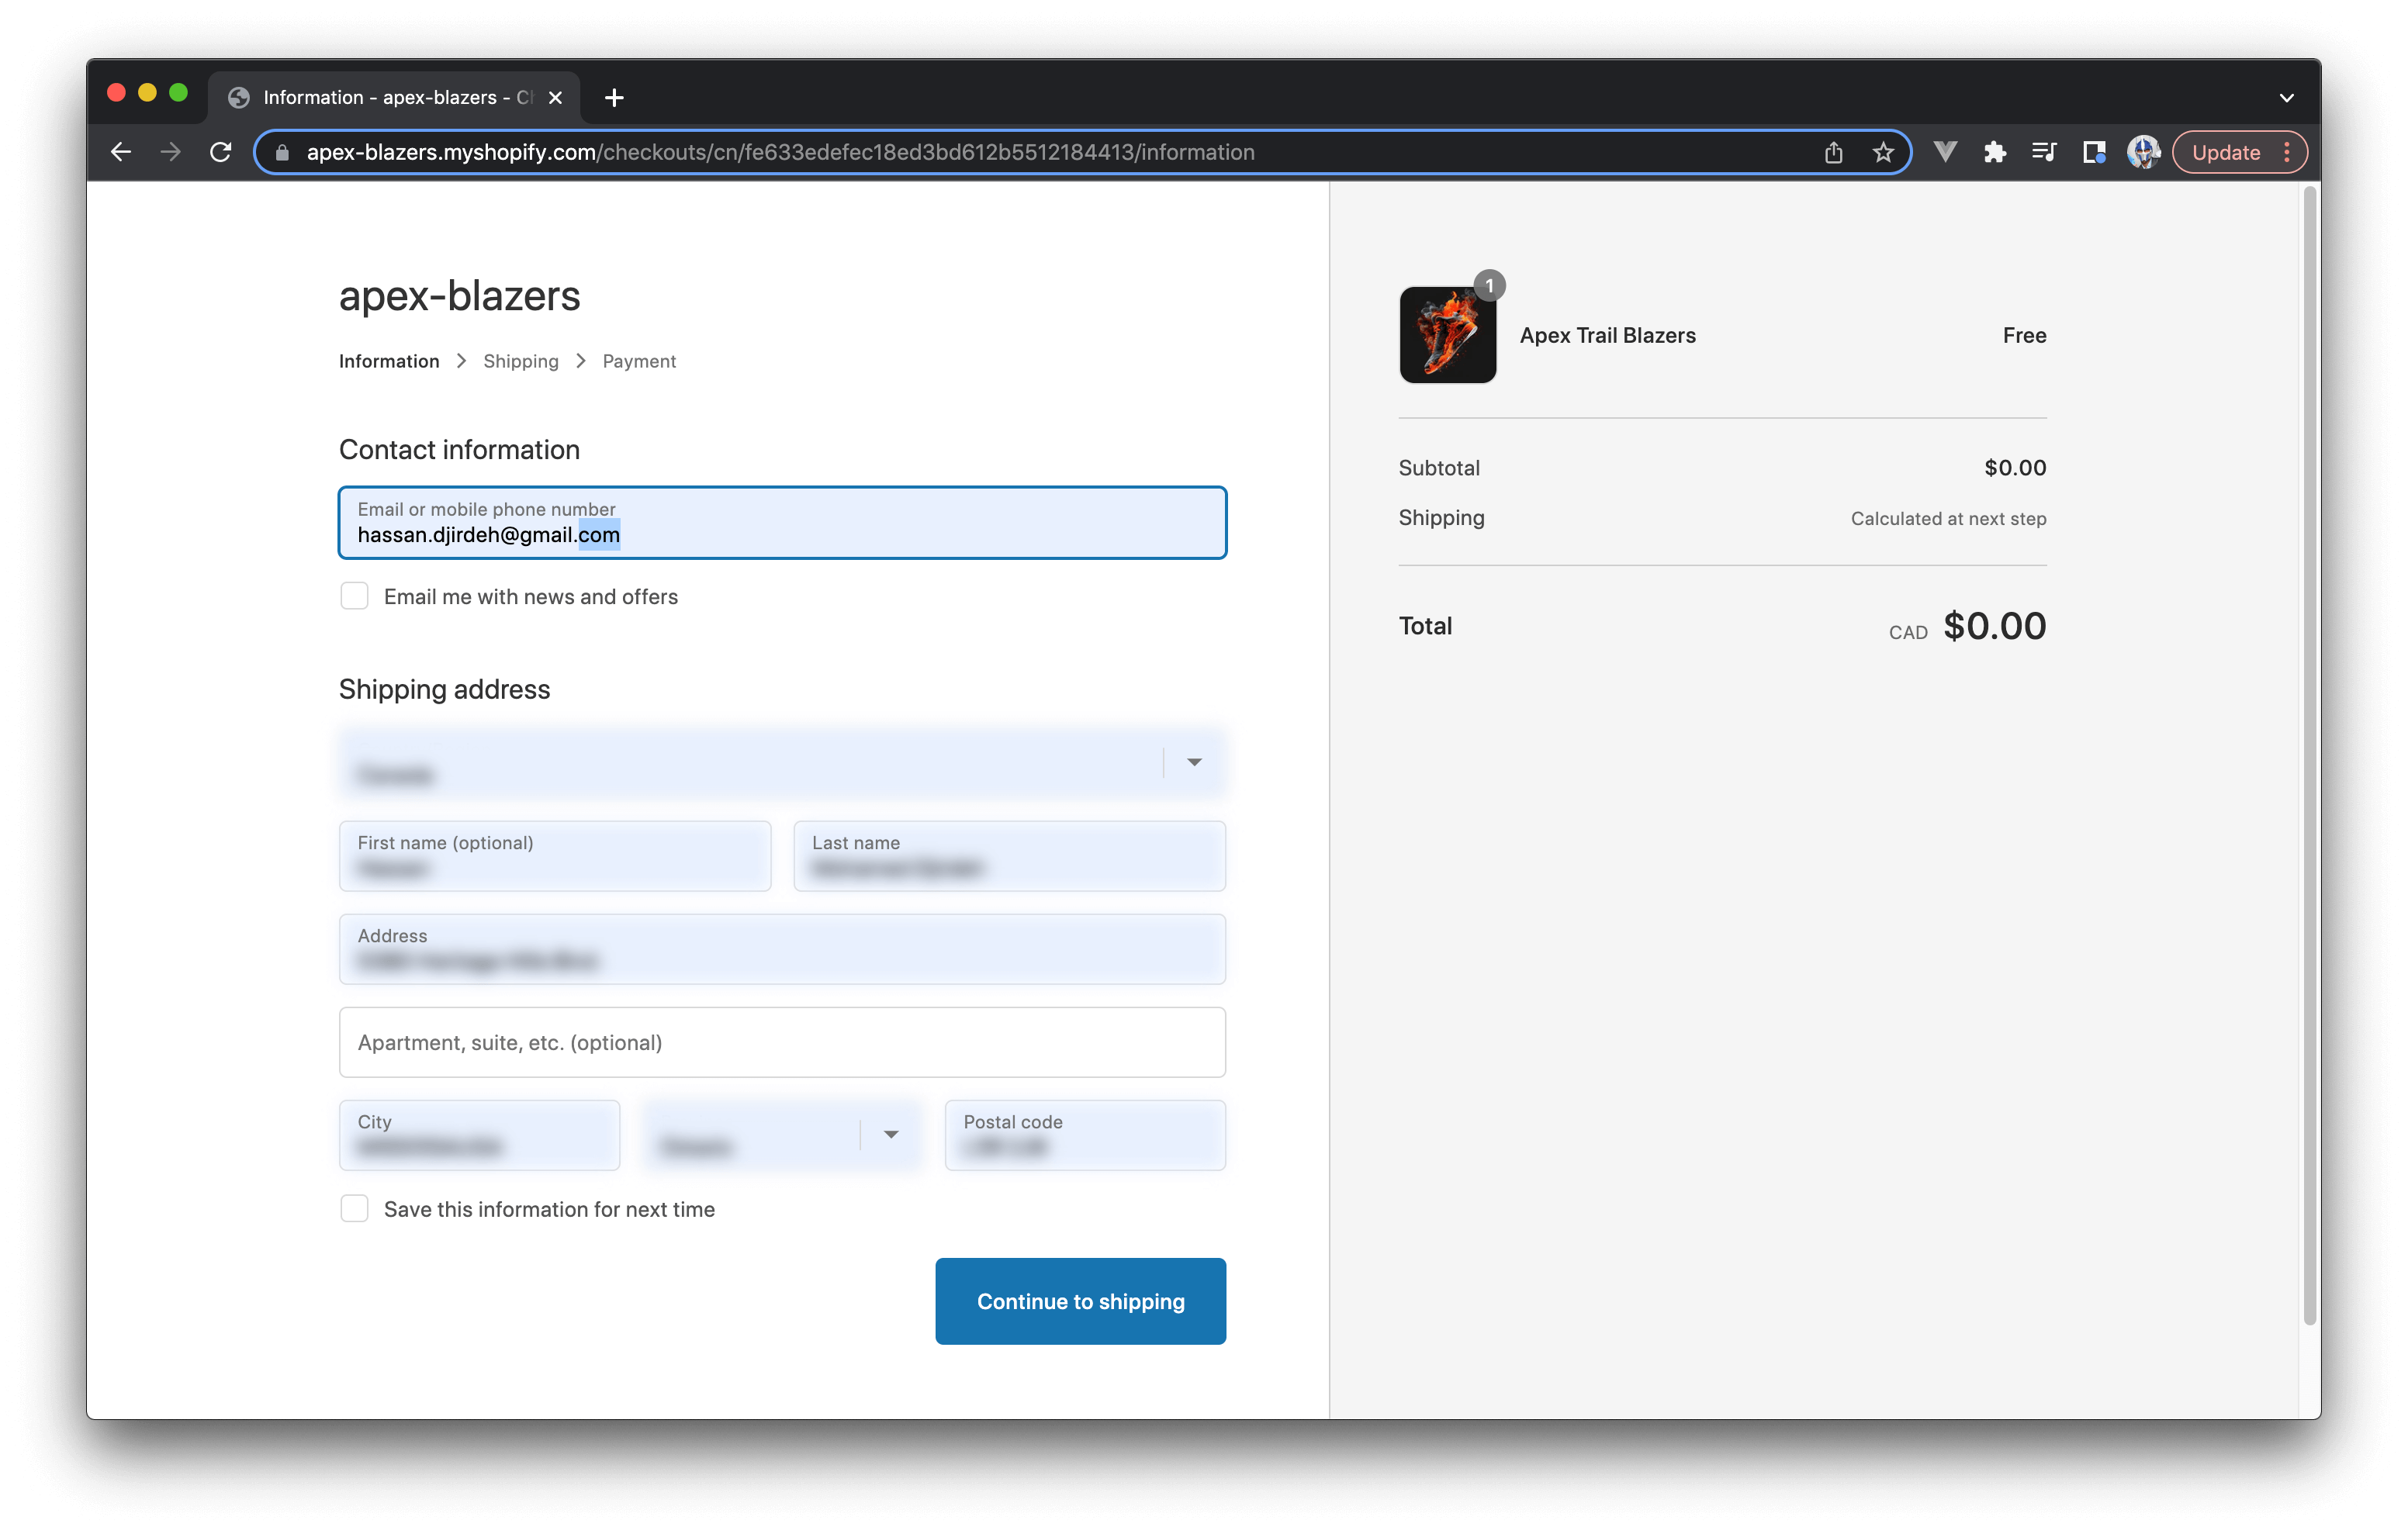
With our changes saved, if we were to click the “Buy Now” button in our app, we’ll be directed to the Shopify checkout flow!

Deploying with Vercel
The last step left for us is to deploy our Hydrogen app to a production URL. Shopify has a deployment tool called Oxygen that acts as a hosting platform for Hydrogen storefronts. However, at the time of publishing this article, Oxygen is only available for Shopify Plus plans so we won’t be able to use it since we’ve only created a standard Shopify store.
Fortunately, there are other deployment providers (e.g. Netlify, Vercel) that allow us to deploy Hydrogen projects with zero (or minimal) configuration. We’ll be using Vercel to do just that.
First, we’ll need to push our code to a remote Github repository like https://github.com/djirdehh/apex-trail-blazers.
Next, we’ll use the Hydrogen template available to us from Vercel. In our deployment configuration, we’ll:
- Link our Github project.
- Specify the project name to be the same as the name of our public Github repo.
- And add the appropriate values for the
PUBLIC_STORE_DOMAINandPUBLIC_STOREFRONT_API_TOKENenvironment variables used in our Hydrogen configuration.
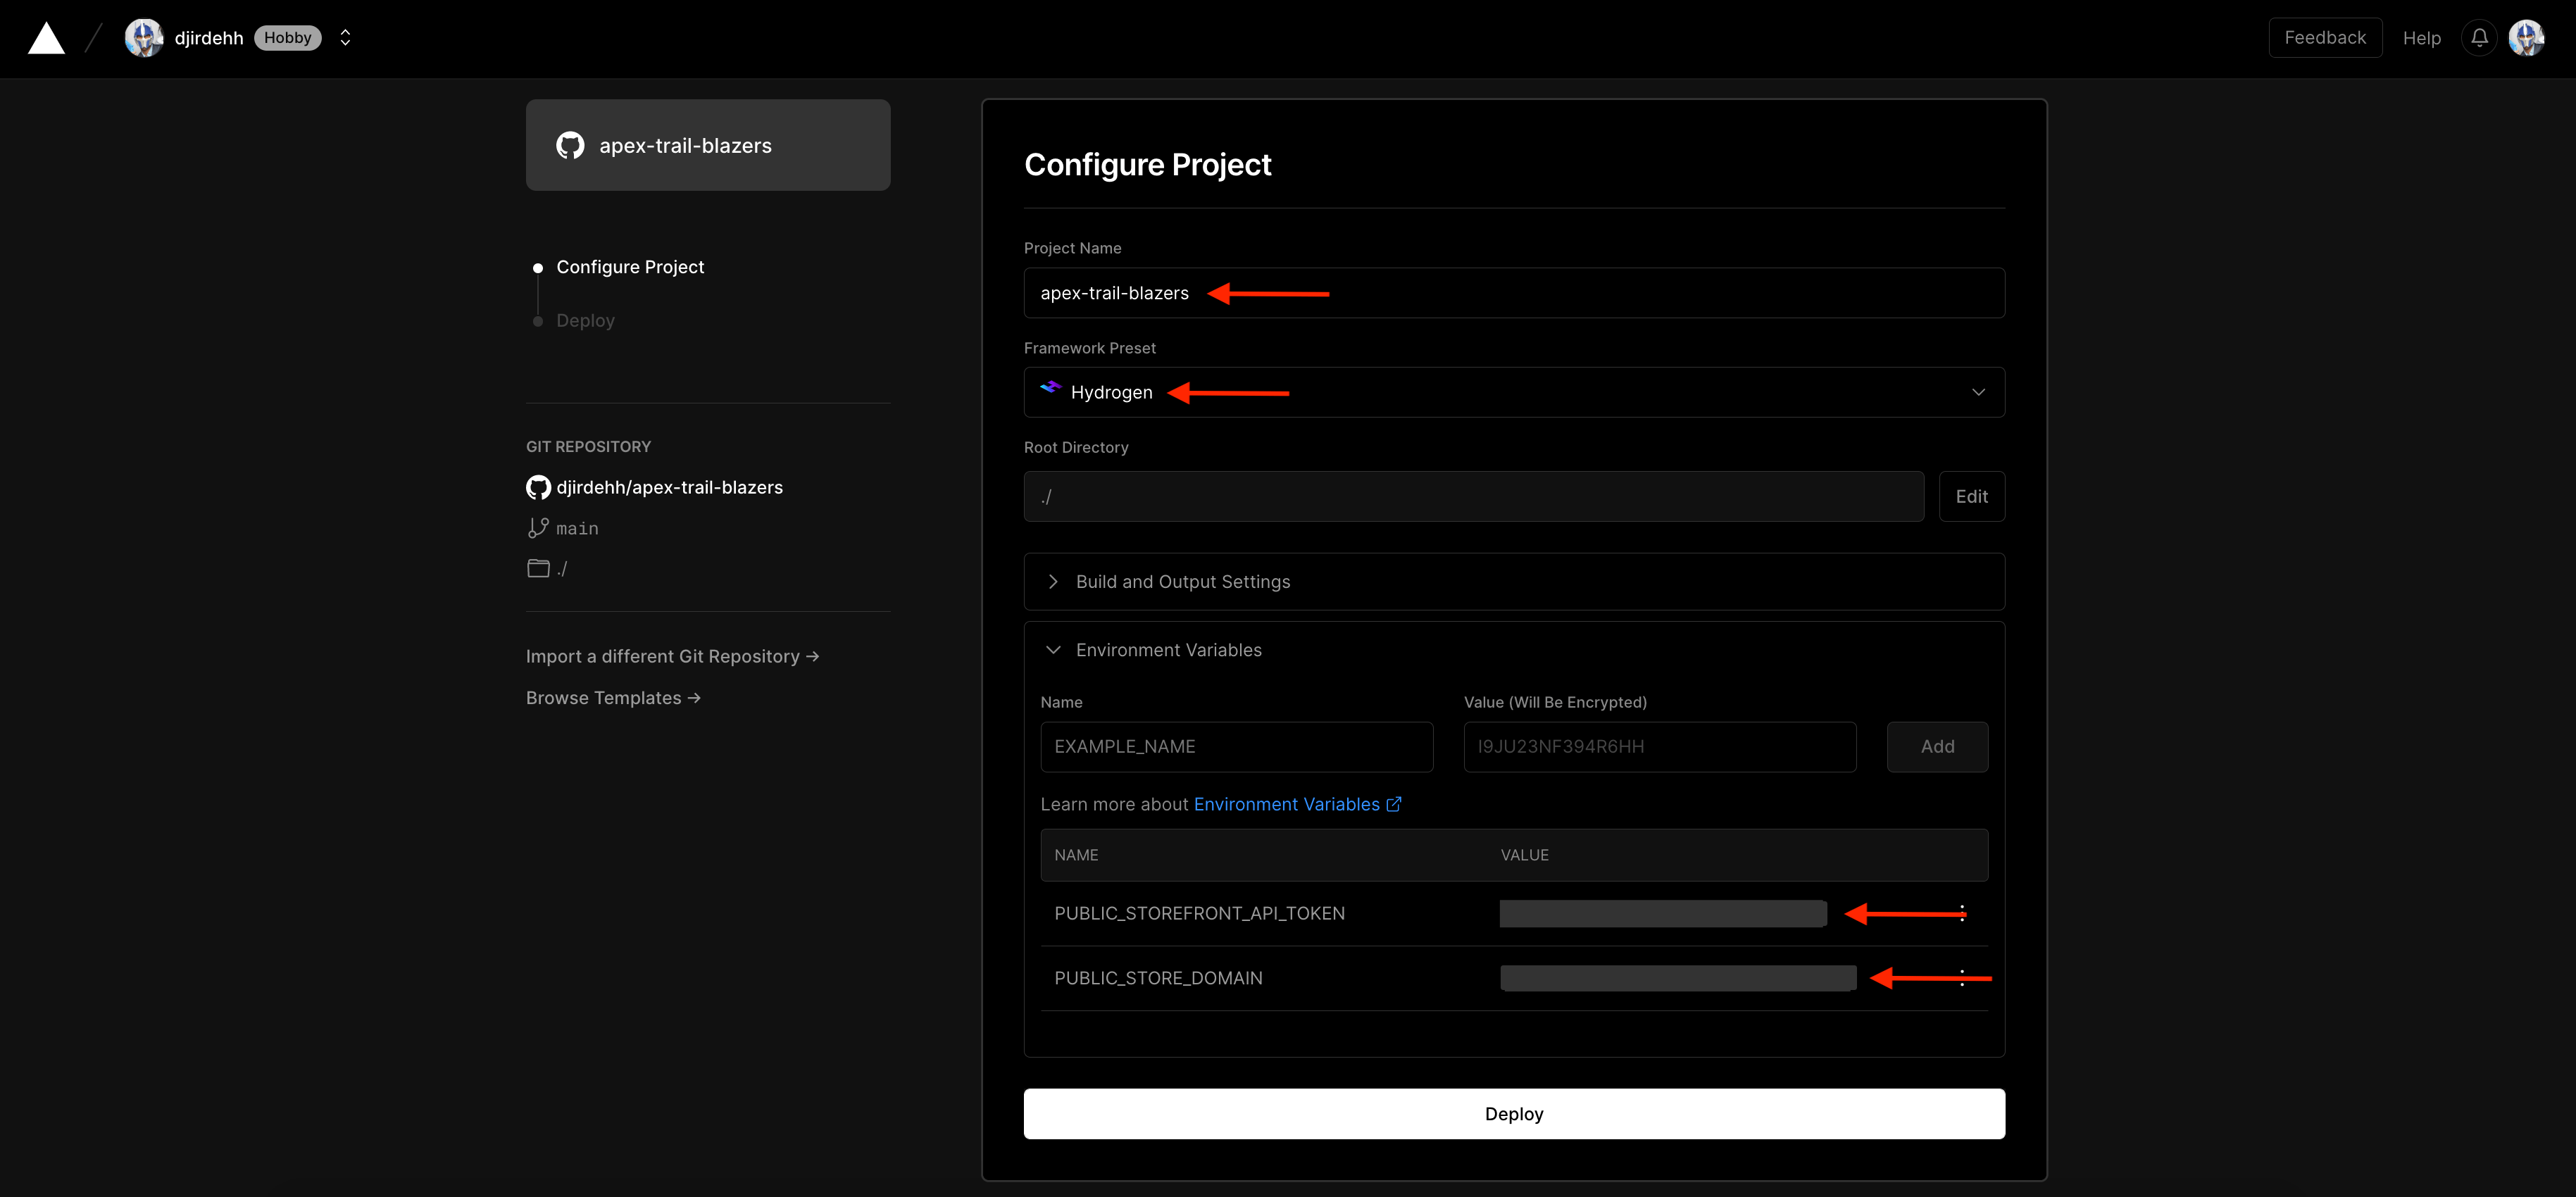
Once our configuration details are provided, we’ll click the “Deploy” button and wait momentarily until the deployment is complete. Once complete, our Vercel dashboard will show our deployed app and we’ll be able to visit the deployed app at https://apex-trail-blazers.vercel.app/.

To verify our production store works as expected, we’ll initiate the check-out process and go through the checkout flow.
Once the checkout has been made complete, we’ll see the order details in our Shopify admin!

Voila! We’ve done what we’ve set out to do and built our custom storefront with the help of Shopify Hydrogen. For producing copy and visuals, we leveraged the help of Midjourney and Chat GPT.
Wrap Up
I hope the article was helpful and informative. I went through the above exercise as a learning process to interact with some of the newer AI tools that have been gaining popularity while also trying out Shopify Hydrogen for the first time. If you have any questions or thoughts, you can always tweet me @djirdehh.
Enjoyed this article and currently looking for technical writers for your blog? Reach out to me @ hassan.djirdeh@gmail.com!